Zynsonix Link

September 9, 2020

Pioneer SE-700 Vintage Headphone Cable Mod and Balancing

The Pioneer SE-700 were the company’s flagship headphones released back in 1974. The driver is an unusual piezo-electric type. I am personally not aware of any other headphone manufacturer that offered this type of driver, but feel free to share in the comments if you know of one. The SE-700, SE-500 and SE-300 all use a similar element. 
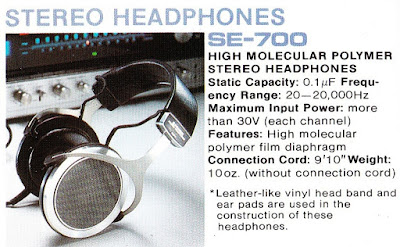
Pioneer SE--700 old advertisement

An old advert for the SE-700 touting their specs


I’d describe the sound as airy, crisp, and similar to an electrostat with a detail emphasis. Bass quantity is very low, which I believe is typical of this type of driver. The simple metal frame and gimbals look rather elegant, and the overall unit is pretty light. The way it rests on the head is slightly odd compared to modern headphones, but it’s still very usable.

The piezo-electric driver is a very thin piece of metal foil with a frame going around the perimeter, with the positive and negative connections at the bottom. It is covered with bright yellow foam resembling a dish sponge. It is also quite delicate, so even opening the headphone can damage the driver. The unit is sealed shut with rubber cement or a similar adhesive so it must be opened very slowly and carefully to access the inside. 
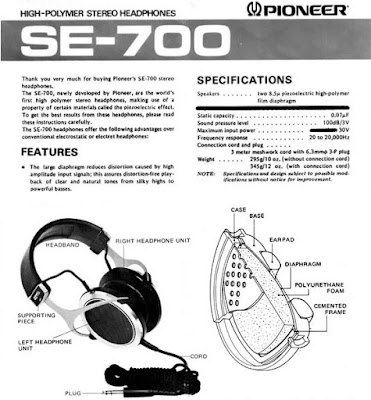

Pioneer SE--700 old manual

An image from the user's manual circa 1974


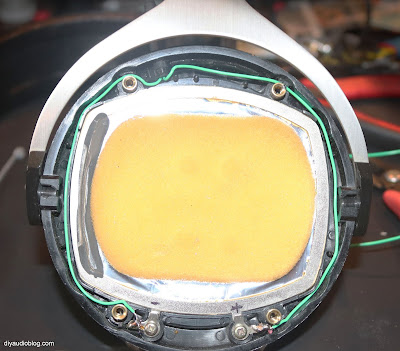
The wire connections for the driver are circled in red below:


Pioneer SE--700 inside earcup


If you’re looking to purchase one of these you can keep an eye out on Reverb, eBay or similar platforms. Price for a good example will generally be between $80 and $150. You’ll probably want to replace the wiring including the 3-meter cloth-covered cable, and the vinyl headband and ear pads which will likely be flaking.

My client Steve who sent me the headphones had already replaced the pads and requested the inner wiring be replaced. The existing wiring contacts had been twisted together and covered with heatshrink (see above image), which seemed like an odd manufacturing choice and not an ideal connection. Running single strands from the connection would sound better. You’ll note both sides of the headphone below after the cabling was replaced.


Pioneer SE--700 inside earcup cable mod

Pioneer SE--700 inside earcup cable mod

The headphone was reassembled using 3M double-sided tape so it can be more easily opened if needed. Steve will be crafting a calfskin headband for the unit as a replacement for the original vinyl headband, which I feel is the only visual let-down. It appears EricJ from HeadFi created an excellent tutorial back in 2007 on creating a replacement headband which you can find here. Below you'll see the refurbished/modded unit.  


I hope you enjoyed this post on one of the more interesting vintage headphones out there. If you have a headphone that needs a cable upgrade please be sure to visit Zynsonix.com


Disclosure: Please remember that using a soldering iron and/or modifying headphones can be dangerous to you and/or your surroundings and should only be performed by a certified technician. The owner of this blog and all associated parties can not / will not be held responsible if you attempt a modification posted above and cause physical harm to yourself or your surroundings. 

August 20, 2020

Avantone MP1 Mixphones Balanced Headphone Cable Mod

Not a headphone commonly discussed on HeadFi, but certainly deserving of some merit, is the Avantone MP1 Mixphones. They are touted as “suitable for use in live sound, DJ, studio recording, mixing playback and listening applications“. The earpads and cups are quite large, isolating, and comfortable, and house sizable 50mm drivers inside. A client of mine, Steve, with a penchant for unusual looking electronics sent me one to work some magic on to see how we could improve it.


The headphone comes with a 3.5mm input on one side and a little switch on the other side with a rudimentary circuit for adjusting the sound to your liking. Steve had tried the unit with an aftermarket Zynsonix cable first, but wanted to run it balanced, and the only way to do so was to remove this little device, which I assumed would help with the clarity anyway.

The circuit, switch and the 3.5mm inlet would all be removed in favor of mini XLR connectors on each cup. Brainwaves XL Hybrid earpads would also replace the stock pads, which Steve mentioned were comfortable but tended to flatten out over time. I indeed read the same thing from other reviewers online so it appears to be a common issue.

The sound had nice body and warmth, but wasn’t super clear, and the resolution on the lower end of the spectrum was somewhat lacking. I knew some mass-loading damping material would help with this and tighten up the bottom end a bit. On the inside, there are more metal parts than you typically find inside a headphone as metal, while adding mass which can be a good thing, tends to weigh things down. Fortunately the headphone remains comfortable. Avantone lists the weight at 550 grams, however it didn’t feel that heavy on my head. I recall Audeze’s EL-8 titanium as the only headphone I found was heavy enough to be uncomfortable, although some have said the same thing about the new HEDD Audio HEDDPhones as well. Good weight distribution goes a long way in assisting with this.

I placed some damping material on the driver surround and the inside of the cup strategically. You don’t need too much to get the desired result. Once everything was put back together with the new balanced cable, circuit delete, damping material, and pads, the sound was notably more resolving and controlled in the lower-end especially. Note the damping placement below:

Damping material placement


Steve’s impressions:

Now, to the unmodified and your modification versions of the Avantone Pro MP1 headphones. Both have Brainwavz XL Round Hybrid earpads. The unbalanced version has a Trebuchet cable. The balanced version has a Ballista cable. They are both driven, not at the same time, from the headphone outputs on the front panel of the Soekris dac1541. Source is a Nuprime CDT-10, output set to 192kHz sample rate, AES/EBU connected to the DAC. Good results began after 15 hours of operation; my observations here are at the 25-hour mark.

As much as I liked the unbalanced version, the balanced version has more of the good stuff: crispness, bass extension, expansiveness, body, blacker background. Surprisingly, this results in a less dry and less analytical presentation than the unbalanced version. This balanced version is easier to listen to for longer sessions. I did try line level balanced output from the Soekris into an XDuoo TA-20 amplifier. [FYI, for this amplifier, balanced in and out is noise free. Any unbalanced, in and/or out, is too noisy for me.] This was not as good a combination. The Avantone headphones, probably because of their very low impedance [16 ohms] and very high sensitivity [113 dB] need the stability and the low noise of solid-state amplification. All in all, a worthwhile and satisfying result.


You can see some images below of the unit. Steve took some of the latter. I took far more images during the process however my Canon T7i decided it was time for a summer vacation and didn’t save the images to the memory card.


Avantone MP1 Mixphones Balanced Headphone Cable Mod


Avantone MP1 Mixphones Balanced Headphone Cable Mod


Anyway, hope you enjoyed this write up, and if you’d like an aftermarket cable or complete recable of the Avantones or other headphones please contact Zynsonix Audio. Thanks very much to Steve for generously sharing his thoughts and time as well!


Disclosure: Please remember that using a soldering iron and/or modifying headphones can be dangerous to you and/or your surroundings and should only be performed by a certified technician. The owner of this blog and all associated parties can not / will not be held responsible if you attempt a modification posted above and cause physical harm to yourself or your surroundings.


July 28, 2020

Removable Balanced Cable Mod for Beyerdynamic DT-1770 Headphones

I'm personally digging the newer, more upscale DT-1770 and DT-1990 from Beyerdynamic. The sound is more balanced and not quite as peaky in the upper midrange. The DT770, 880 and 990 are still incredible values though, and I'd recommend them to anyone looking to get into headphones. 

There's one glaring omission that Beyer could have done better with 1770 and 1990, and that's not using a 4-pin XLR with isolated grounds so the headphones could be run with balanced amps. For a headphone costing nearly $600 and given how little it would cost to implement is a strange business decision. Drop has actually released a version of the 1770 called the DT-177X which uses a 4 pin XLR, so I encourage anyone considering the DT-1770 to get that instead. 


3 pin XLR
3-pin XLR? That's no good!


Fortunately for Beyer fans, the existing units can be modified for balanced amplifiers. This involves removing the 3-pin XLR and much of the existing wiring and isn't very difficult. 

Below you'll see the offending 3-pin XLR which needs to be replaced. To open up the headphones, first the earpads are removed, then pry off the retaining ring using an envelope opener or similar tool. 

Beyerdynamic DT-1770 balanced cable mod 2


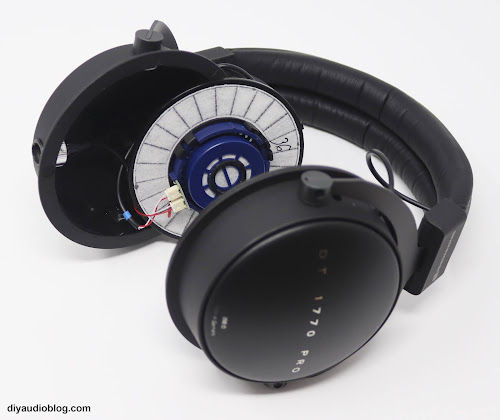
Under the retaining ring are the drivers. If you look carefully, there is a little indent on the outer edge of each. Using a small flathead screwdriver, you can apply some pressure to pry up the driver frame and remove it from the cups. This should all be done carefully as to not damage the drivers or the fabric on the driver frame. 

Beyerdynamic DT-1770 balanced cable mod 3


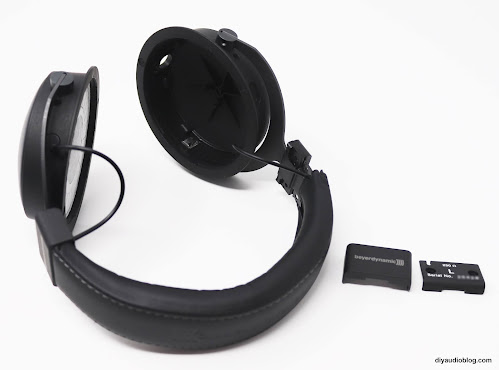
The drivers will often have a number on them. This is likely for matching purposes at the factory. In addition they will have a red dot near one of the wires. This tells you which side is positive. The wires can be trimmed and the drivers removed. Next the headband has to come off to replace the wire between the cups. There are a couple of screws to remove on the plastic brackets and you can then open up the headband and remove the wire. 


Beyerdynamic DT-1770 balanced cable mod 4


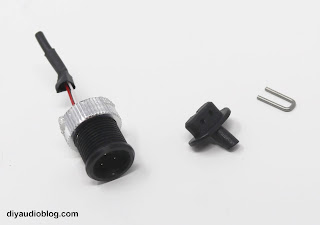
Other items that need to come off are the 3-pin mini XLR and the little strain relief pieces. The mini XLR has a plastic ring that screws it in place. There's a little bit of adhesive but it's not difficult to get off. The strain relieve pieces have a metal retaining piece, remove that and pull them out of the cup. They will need to be cleared out inside with a drill or dremel to provide clearance for thicker wire. 


Beyerdynamic DT-1770 balanced cable mod 5


Once everything is out, the replacement wire is soldered to a 4 pin mini XLR (Switchcraft or similar) and is fed through the strain relief pieces (orange circle below) through the headband and out the other side. The plastic pieces holding the headband in place have small indents where the wire enters and exits (red circle below). Inside, a zip tie should be placed right under the strain relief so the wire can't yank on the driver connection if it gets caught, and some light adhesive can be placed, then the metal retaining piece can be reinserted. 

Beyerdynamic DT-1770 balanced cable mod 6


Once everything is in place, you can insert the mini XLR back into the cavity on the bottom of the cup and screw on the stock plastic ring. Use a bit of adhesive or Loctite to ensure this does not come undone. 

Below you'll see the wire running to one of the headphone drivers. Beyerdynamic is now using small pins and a circuit board for ease of assembly. The pins are too small to solder to directly, so the wire should be soldered close to the board with a little bit of room for flexibility. Adhesive heatshrink should be used to prevent shorting. 

If you decide to try and remove the pin jacks and solder directly to the PCB, be very careful as you can damage the diaphragm wire which is quite thin. I personally do not recommend this as you'll likely find yourself buying a new set of drivers, but if you'd like to try it, godspeed. 
 

Beyerdynamic DT-1770 balanced cable mod 7


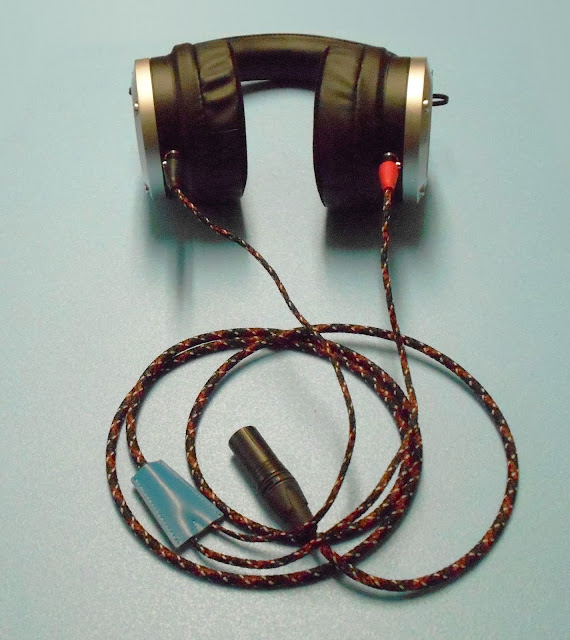
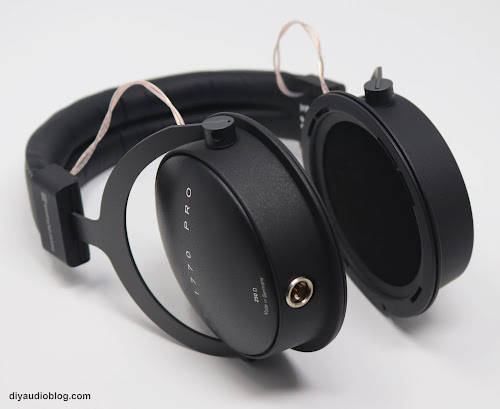
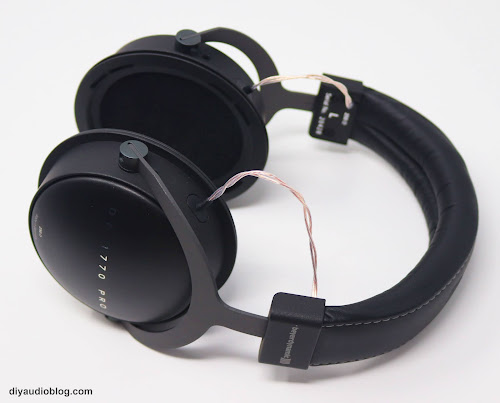
Once you have everything in place, you can reassemble the headphone. Below you'll see the modded DT1770 Pro (sans earpads, they were retained by the owner) and a spiffy new Zynsonix Ballista cable to go with them. 


Beyerdynamic DT-1770 balanced cable mod 8

Beyerdynamic DT-1770 balanced cable mod 9

Beyerdynamic DT-1770 balanced cable mod 10


I hope you enjoyed this brief tutorial and hope your mod goes well. If you'd prefer someone else have all the fun, please contact Zynsonix Audio who would be happy to handle it for you. 


Disclosure: Please remember that using a soldering iron and/or modifying headphones can be dangerous to you and/or your surroundings and should only be performed by a certified technician. The owner of this blog and all associated parties can not / will not be held responsible if you attempt a modification posted above and cause physical harm to yourself or your surroundings. 
June 29, 2020

The Retro Evercade Console is Here!

I've been waiting for the Evercade for quite a while and it's FINALLY here! 

It's pretty darn close to what I expected. The Evercade is a value-oriented product, so there are a number of compromises necessary to hit that low-cost sweet-spot. What really matters though is if it scratches that nostalgic itch and does a decent job of presenting the games, especially to those who may have never played them before. Get a low-down below of where Evercade really hits the mark and where it falls a little short:


Evercade Console
The Evercade console in white


What's great:

  • Huge selection of cartridges right out the door (10 available, 4 coming in Q3)
  • The console has a decent weight to it and the build quality is solid. There’s no quality concerns like with generic consoles from China like the SupaBoy (e.g. hair or dirt behind screen, smudges in finish, etc.)
  • The buttons have a great feel and response. The response similar to an Xbox controller, which is high praise.
  • The L+R buttons have a little less weight but make a satisfying clicky sound
  • The cartridges are a good size, maybe around the size of a Game Gear game (not tiny and easy to lose like the Switch)
  • Easy-to-access menu during gameplay
  • Nice looking, quality boxes for the cartridges and color manuals
  • Rechargeable battery
  • HDMI output
  • Low priced games and system. The system is about $100 with three cartridges, and the cartridges are $20 each. The system with all ten games is $200.

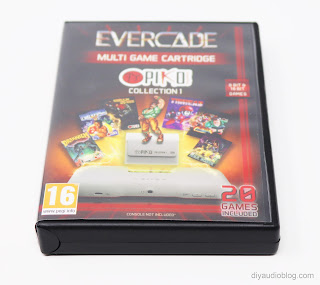
cartridge case

evercade cartridge case
Love the cartridge cases!

What could be better:

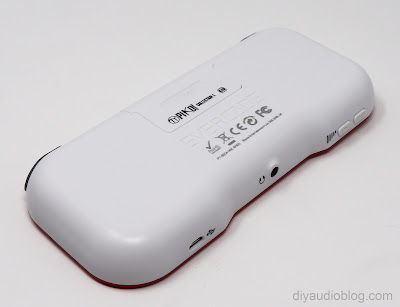
  • Cartridge fit is fairly tight… not on the contacts, but the left and right sides are lacking adequate clearance.
  • D-pad feels a little mushy, about what you’d expect from a 3rd party value controller
  • Screen angle viewing isn’t great, but you’re going to be head on playing this thing so not a big deal
  • Screen could be a little larger
  • There seems to be only one save state per cartridge, vs. one per game
  • Sound quality isn’t the greatest. Granted these are 8 and 16 bit tunes, but they can still sound better with a little more wattage and a larger driver.
  • A number of the games are two-player, but I don’t think there’s a way to link up two of these puppies.


Evercade Console Back
That cartridge fit is tight!


Overall I think the Evercade is a really nice gesture to the retro gaming community. It’s a solid product with a price-point that’s accessible to many and already has great support from developers. The whole premise reminds me a bit of the NEO GEO X Gold, which was a nostalgic system released mostly for collectors where games were sold separately via cartridge. While I love SNK and the Neo Geo, I think the Evercade has more going for it than the X Gold with access to a variety of publishers. 

The real litmus test is in the games, and Evercade already has 10 titles available at launch (very impressive) and 4 more which will be releasing in Q3. Not only are there classic games, but new titles like Xeno Crisis and Tanglewood are being released. I’d really like to see it succeed so we can have even more newly released games and more classic collections to check out. I think the unit’s success in the market will be dependent on gaining more buy-in from devs so there are more carts available to consumers.


Storage Case
The storage case is a nice option


What could Evercade do to make a very solid release even better?

  • Allow a save state for each game and enable two player via a firmware update.
  • Offer a premium stand-alone console later down the line that addresses the compromises (screen, d-pad, speakers, maybe include a bigger battery) and sell for $199-$249. Collectors aren’t as price sensitive as normal consumers.


Currently available cartridges

  • Atari Collection 1 (with 20 games)
  • Namco Museum 1 (with 11 games)
  • Data East Collection 1 (with 10 games)
  • Interplay Collection 1 (with 6 games) 
  • Atari Collection 2 (with 20 games)
  • Namco Museum 2 (with 11 games)
  • Interplay Collection 2 (with 6 games)
  • Mega Cat Studios Collection 1 (with 10 games)
  • Piko Interactive Collection 1 (with 20 games)
  • Technos Collection 1 (with 8 games)


June 12, 2020

Balanced XLR Switchbox - Audio Design HAS-3LB

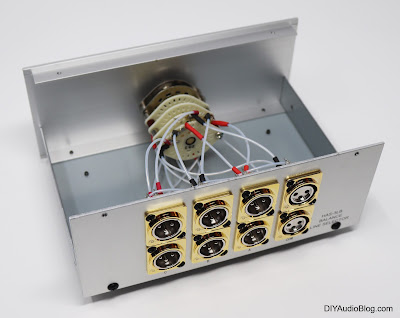
When it comes to passive balanced switchboxes, there aren't a whole lot of off-the-shelf options out there. It's not uncommon to just build them from scratch with a nice switch and point-to-point wiring as they're not terribly complicated.

I recently learned of a Japanese audio company called Audio Design that offers a simple but solid 3 in, 1 out balanced switchbox. The outside is a straight-forward design with a dark blue and silver aluminum box with a brushed aluminum front panel. The only control is the single selector knob up front to switch between the 3 outputs. What counts though is the inside, where there is a high-quality Seiden selector switch, some high-quality Neutric XLR jacks, and some thick copper wire... which appears to be 18 or 20 gauge. 


Balanced XLR Switchbox - Audio Design HAS-3LB

Balanced XLR Switchbox - Audio Design HAS-3LB


One of my clients owns the unit, and wanted to take it to the next level. The Seiden switch is already top-notch, could stay, but we'd replace the copper wire with solder core silver wire in Teflon tubing, the XLRs with the shiny and beautiful Cardas XLRs, and the generic plastic feet with EAR isodamp feet. 

I will say in advance, if you will be using the Cardas CM F and CM M XLRs, you better have a solder pot. The rhodium plating is not terribly interested in taking on solder so the areas where the wires connect need to be submerged in very hot solder for 10-15 seconds before they will be responsive. I personally use an American Beauty MP-9 solder pot for small jobs like this. I turn it on to the highest temp and let it warm for an hour before using. Kester low dross solder works well. 

Once all the Cardas XLRs had been prepped, the old Neutrik XLRs were removed from the rear panel and replaced. They are the same DIN dimensions, so no need to change the hole sizes or shapes. Note that the Cardas units have pins can comply to some extent thanks to a soft material surrounding them. I don't know if this was done for vibration damping or maybe the tolerances aren't super tight, but just an observation. 

The 24 gauge solid silver is then hand-sleeved in Teflon tubing and attached to each terminal. One should note to not make the paths too short or tight, as this will pull on the decks of the Seiden switch and cause there to be less surface area for the gold plated contacts to press upon. I chose to add heatshrink tubing over the solder contacts as silver will oxidize over time. The oxidation is still conductive, but it doesn't look as nice. Also it keeps the joints secure when shipping. 

 
Balanced XLR Switchbox - Audio Design HAS-3LB

Balanced XLR Switchbox - Audio Design HAS-3LB

Balanced XLR Switchbox - Audio Design HAS-3LB

Balanced XLR Switchbox - Audio Design HAS-3LB


The feet on the unit are attached with screws into threaded holes. There are no nuts or lock washers to worry about, so switching them is quick and painless. 

Whether modded or not, I think the Audio Design HAS-3LB is a very solid unit with no real shortcomings other than a slightly vanilla design. Should you wish to extract every bit of performance out of a stock unit, reach out to zynsonix.com for pricing information. 


Disclosure: Please remember that building/modifying circuits can be dangerous to you and/or your surroundings and should only be performed by a certified technician. The owner of this blog and all associated parties can not / will not be held responsible if you attempt a build or modification posted above and cause physical harm to yourself or your surroundings. 

April 29, 2020

Dynaco PAS Full Function RCA Jack Kit from Dynakit Parts


Likely the most popular tube amps in existence, Dynaco has many fans both young and old. Given how well they have stood the test of time, I hope they continue to be sought after for many decades to come. There are a number of companies offering kits resembling the originals with modern bits and pieces, but if you want to build or restore a Dynaco as close to the spirit of the original as possible, Dynakit Parts offerings are a great choice. 

Dynakit Parts is a company based in Paramus, New Jersey and has an impressive selection of reproductions of all the most popular Dynaco vacuum tube products. The kits are about as close to the originals as you can get, from the can capacitor to the screw-down terminal strips but have the benefit of using freshly made transformers and other modern parts.

If you are familiar with the older Dynakits from the 60s, you will remember they featured RCA inputs that are a little different than what we typically see today. On the pre-amps and integrated amps, they were spaced very close to one another and it is hard to find RCA cables that fit them now-a-days, not to mention middling quality (though good for the time).

There have been several attempts to reproduce the RCA board on the PAS using higher quality materials, however because of the spacing, not all the RCAs were able to fit in these offerings. Now that we're in 2020 that is not the case. Dynakit Parts has created a very nice-looking solution for those of you looking to feature all the inputs of the original while also providing a high-quality solution. Best of all, you do not have to cut or modify the existing chassis in any way, the kit fits like a glove. 


Above you'll see the items that are included in the kit. You get the handsome brown polyimide board with integrated grounding scheme, nine pair of gold RCAs, two pair of half-watt resistors, a bag of hardware, some detailed instructions, and a nice decal to identify the connections. The cost is a very reasonable $75, especially considering how many gold-plated RCAs are included. Last I checked they run about $6 a pair at PartsExpress, so you can do the math.

Something else that $75 bucks buys you is you don't have to wire up all the ground connections. Just tightening on the RCAs makes electrical connection with the integrated grounding. The image below gives you a better look at the traces.


So what do you have to do to get this puppy ready for install? Simply populate the RCAs onto the board and lightly tighten with a socket tool of your choice. Next you add the resistors and solder in place, and viola! you are done. So simple you can knock it out in 5-10 minutes. You'd then install on your PAS chassis using the provided hardware, or if you prefer a permanent install you can use pop-rivets to fasten the board in place.


Here is the other side of the board when completed.


...and here are a couple of images of the unit installed in a chassis (the nice ground lug is included in the parts):


So what's the verdict? If you are looking for an RCA board that features all the connectivity of the original PAS, this is a no-brainer. It's well made, easy to use and the gold RCAs look like they'll withstand the test of time. You could make a similar board yourself by drilling out a FR4 board, but you'd end up paying the same or more and it probably wouldn't look as nice. 

Now, if you're not a purist and don't need every connection available for the PAS, Dynakit Parts makes a nice kit with a couple less RCAs for a very reasonable $50 (as of this writing). 

If you're interested in the PAS RCA board or other Dynaco-related items, whether building a kit or performing a restoration, Dynakit Parts should be on your short-list. I've ordered quite a few things from Kevin over the years and everything has been superlative.

Hope you enjoyed the write-up. For more PAS related entertainment, you can check out this restoration I did several years ago.


Review disclosure: Dynakit Parts provided a reviewer's sample of the PAS RCA Board to DIYAudioBlog for an honest review. 

February 4, 2020

AudioQuest NightHawk Carbon Custom Headphone Cable


Unless you’ve been hiding under a rock, you’d know that AudioQuest is one of the most prolific audio cable manufacturers in the business. They also make some other nice stuff including the Dragonfly-series USB DACs and Niagara-series power conditioners. I personally really like their Jitterbug, an inexpensive little USB device that filters the power on your computer’s USB out.

Several years ago, Audioquest released their first foray into the burgeoning headphone market: The Nighthawk. The Nighthawk was priced competitively at $699 when it came out in 2015. It also made use of 3D printed "plastic-wood" cups, which was relatively cutting edge for the time. Since then, there’s been so much fierce competition in this price range that it would be hard to recommend it at its original price (these days I’d recommend the Audeze LCD-2 Classic or MrSpeakers/Dan Clark Audio AEON in this range). 

AudioQuest must have noticed the sea-change in the space, subsequently reducing the price to $599, then to $399, before discontinuing it at a price of $249. Somewhere during this 5-year stint the NightHawk Carbon came out with a revised driver and a closed-model, the NightOwl, came out. The interesting plastic-wood was also replaced with a less unique (and probably less polarizing) shimmering dark blue, not too far from the color-scheme of some Massdrop headphones like the Sennheiser HD-6XX (see 6XX mods here). 

Does the free-falling price-point insinuate that Audioquest's stint into headphones was poorly executed? Not at all, it's actually quite good for a company's first entry in the space. I personally find them a joy to listen to. Their signature is warm, slightly dark, very forgiving of poorly recorded music (think garage indie and alternative rock), and provide good bass quality and quantity. They’re well suited for movies and videogames in addition to music. They’re also very easy to drive with a 25-ohm impedance, and they’re light and comfortable. Some other niceties include a substantial travel case, two different pairs of earpads in the box (leather and velour), and a headphone cable with a microphone built in.

Oddly, the headphone cable is only four feet, which is a length typically reserved for headphones that are intended for mostly portable use. Given the NightHawk is semi-open and is not foldable, this is an odd choice, but fortunately solvable given the cable is user replaceable.

Given the Nighthawks are on the dark/warm side of things, a crisp-sounding cable will help bring the details out and give the headphone a more balanced sound. I chose the Xev, which is silver-clad copper in PTFE, rather than an all-copper or litz copper solution. Had the headphone been more detailed to start, a copper cable would work perfectly well.

The Xev is a hand-braided litz of four isolated 24 gauge silver-clad copper wires sleeved in soft black nylon multifilament from TechFlex. 


The NightHawk makes use of 2.5mm TS connectors, where the sleeve is ground/negative, and the tip is signal/positive. They need to be slim fit or you'll run into issues. Eidolic makes a nice connector that fits the requirements as of this writing, and you can find solutions on AliExpress as well.


Below is a photo of the completed Xev cable, flexible and lightweight with plenty of length for those of us that need more than 4 feet. 


The sound is notably more balanced with more prominent treble, making it a definite keeper. 


If you are interested in the NightHawk Carbon, I'd suggest picking one up soon, as they are discontinued and AudioQuest has released a letter to distributors indicating they don't plan to offer any subsequent headphones, at least not in the immediate future. For the current price, build quality and extras, I could see this being a great first step into audiophile headphones, although one should also check out the Sennheiser/Massdrop HD-6XX, it's a hard value to beat.

To order a custom cable for the NightHawk, NightHawk Carbon, NightOwl, or many other headphones, please visit Zynsonix.com today.