Zynsonix Link

Showing posts with label audio switchbox. Show all posts

March 30, 2021

Headphone Switchbox in a Compact Chassis

A few years ago I made a headphone switchbox. It was popular enough that I added it for sale on Zynsonix. It uses a standard Hammond chassis which is made in Canada. There have been people looking for a more compact version. Unfortunately Hammond doesn't make a super compact extruded chassis from this line, however a fellow over at HeadFi, ScornDefeat, was able to find a smaller chassis that fits everything (just barely). I believe it's the same chassis as the Objective 2 headphone amp. The size is 3.15" x 5.25" x 1.37" / 80 x 134 x 35mm (LWH) and it comes in anodized black, silver, or blue. 

Rather than Electroswitch in the previous build, the similar 3 pole Lorin CK-1460 is used, and rather than the flashier Neutrik NMJ6HC-S with silver hexagon design, the plain black NMJ3HF-S is used. These are all about the same size so should be interchangeable. 

The knob is a 1/4" Kilo machined aluminum knob. I prefer the selector on the right as it's a little more natural to use the right hand to switch outputs. 

One oddity to note is the chassis that came from Amazon had tapered head silver screws and the chassis screw holes needed to be threaded (Hammond chassis comes pre-threaded). 


If you'd like to build one of these yourself, it shouldn't take longer than 2-3 hours. I recommend solid core 24 AWG wiring for headphone signal wiring inside of a chassis. 

If you'd like one of these built for you for your headphone switching needs, reach out to Zynsonix


June 12, 2020

Balanced XLR Switchbox - Audio Design HAS-3LB

When it comes to passive balanced switchboxes, there aren't a whole lot of off-the-shelf options out there. It's not uncommon to just build them from scratch with a nice switch and point-to-point wiring as they're not terribly complicated.

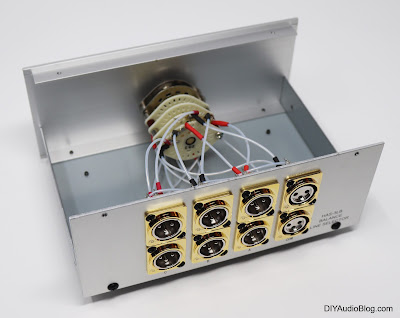
I recently learned of a Japanese audio company called Audio Design that offers a simple but solid 3 in, 1 out balanced switchbox. The outside is a straight-forward design with a dark blue and silver aluminum box with a brushed aluminum front panel. The only control is the single selector knob up front to switch between the 3 outputs. What counts though is the inside, where there is a high-quality Seiden selector switch, some high-quality Neutric XLR jacks, and some thick copper wire... which appears to be 18 or 20 gauge. 


Balanced XLR Switchbox - Audio Design HAS-3LB

Balanced XLR Switchbox - Audio Design HAS-3LB


One of my clients owns the unit, and wanted to take it to the next level. The Seiden switch is already top-notch, could stay, but we'd replace the copper wire with solder core silver wire in Teflon tubing, the XLRs with the shiny and beautiful Cardas XLRs, and the generic plastic feet with EAR isodamp feet. 

I will say in advance, if you will be using the Cardas CM F and CM M XLRs, you better have a solder pot. The rhodium plating is not terribly interested in taking on solder so the areas where the wires connect need to be submerged in very hot solder for 10-15 seconds before they will be responsive. I personally use an American Beauty MP-9 solder pot for small jobs like this. I turn it on to the highest temp and let it warm for an hour before using. Kester low dross solder works well. 

Once all the Cardas XLRs had been prepped, the old Neutrik XLRs were removed from the rear panel and replaced. They are the same DIN dimensions, so no need to change the hole sizes or shapes. Note that the Cardas units have pins can comply to some extent thanks to a soft material surrounding them. I don't know if this was done for vibration damping or maybe the tolerances aren't super tight, but just an observation. 

The 24 gauge solid silver is then hand-sleeved in Teflon tubing and attached to each terminal. One should note to not make the paths too short or tight, as this will pull on the decks of the Seiden switch and cause there to be less surface area for the gold plated contacts to press upon. I chose to add heatshrink tubing over the solder contacts as silver will oxidize over time. The oxidation is still conductive, but it doesn't look as nice. Also it keeps the joints secure when shipping. 

 
Balanced XLR Switchbox - Audio Design HAS-3LB

Balanced XLR Switchbox - Audio Design HAS-3LB

Balanced XLR Switchbox - Audio Design HAS-3LB

Balanced XLR Switchbox - Audio Design HAS-3LB


The feet on the unit are attached with screws into threaded holes. There are no nuts or lock washers to worry about, so switching them is quick and painless. 

Whether modded or not, I think the Audio Design HAS-3LB is a very solid unit with no real shortcomings other than a slightly vanilla design. Should you wish to extract every bit of performance out of a stock unit, reach out to zynsonix.com for pricing information. 


Disclosure: Please remember that building/modifying circuits can be dangerous to you and/or your surroundings and should only be performed by a certified technician. The owner of this blog and all associated parties can not / will not be held responsible if you attempt a build or modification posted above and cause physical harm to yourself or your surroundings. 

May 24, 2018

DIY Headphone Switchbox

It's a head-scratcher why this hasn't been requested before... a switchable headphone output box. I know so many people in this hobby who have more headphones than fingers and toes, so something like this should be commonly on headphone enthusiasts desks across the world! Haha, well maybe not...

Anyway, I had a client approach me who wanted a switchbox so he could switch easily between four headphones. Obviously you don't want to have all four headphones connected at once due to various drive and impedance issues, hence the switch. In addition, the unit should be as transparent as possible as sound quality is paramount in this hobby... so we have a point-to-point 1 to 4 headphone switch, so up to four headphones can be connected simultaneously to an amp, and switching between them is as simple as the click of a switch (and swapping them on your head).

For the box I used a Hammond extruded aluminum box with aluminum endplates, anodized black (everyone likes black). It needed to be a wider model for enough panel real estate for the switch and four 1/4" connectors.

While 4 pole, 3 throw switches are as plentiful as flatulent passengers in airplanes, 3 pole, 4 throw are a little more difficult to find. I used one made in the U.S. by Electroswitch, found on Mouser. If funds permitted we would have gone with Elma/Goldpoint, but this is a great switch with smooth operation. For the 1/4", I went with the super common Neutrik NMJ6HC-S, which is the more attractive jack from their M-Series and is very reliable. It has switching ability as well, but that wasn't needed in this application.  

Here's a few progress pics below: 

Lining up the jacks 

Drilling the pilot holes

Mounting the jacks and switch


Installing the Kilo aluminum knob

Everything was wired up using solid core silver-clad wire in PTFE. I highly recommend this wire for internal chassis work. It sounds excellent and is easy to work with. Just be sure not to be too aggressive when stripping it as if you nick the solid core wire, it can break off and you'll end up with an open circuit. You'll note below the ground is tied to the chassis via a screw and locking solder lug. This is important to ensure the metal chassis has active shielding from noise no matter which output is selected. 

Interior wiring

This is a simple, effective switchbox which hopefully the client will enjoy. 


Final Product


Hopefully you have fun reading this, and who knows, maybe someone will want an 8, 12 or 16 headphone switchbox in the future! You guys will be the first to know ;)

To purchase this product, visit Zynsonix.com


Please remember that building/modifying circuits can be dangerous to you and/or your surroundings and should only be performed by a certified technician. The owner of this blog and all associated parties can not / will not be held responsible if you attempt a build or modification posted above and cause physical harm to yourself or your surroundings.