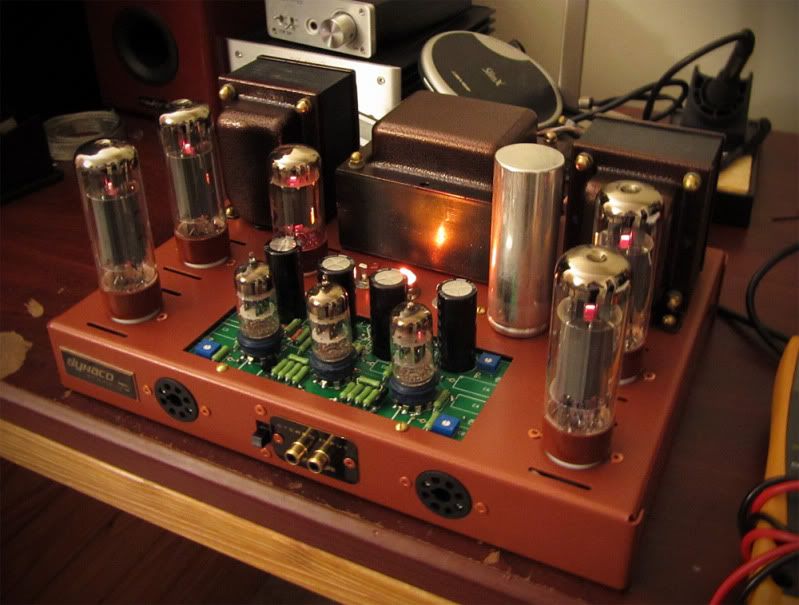
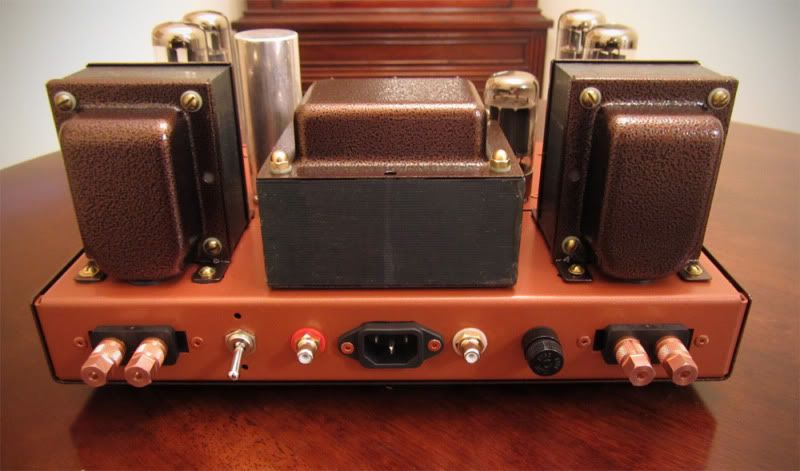
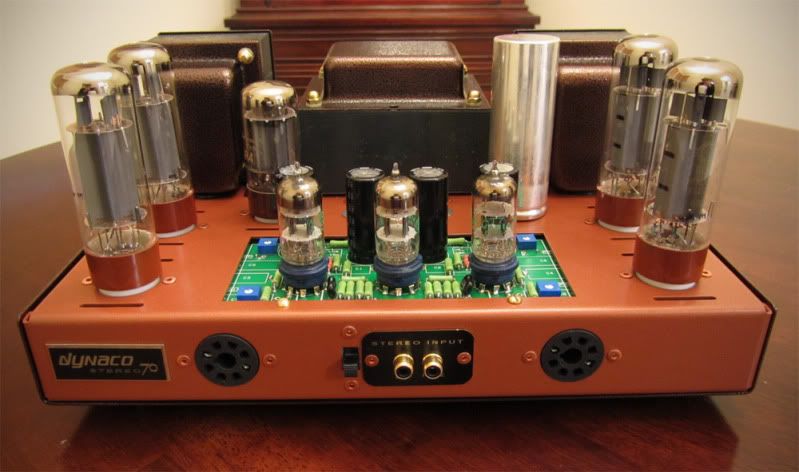
The ST35, also known as the Stereo 35, was released by Dynaco in 1963. It's the baby brother of the Dynaco ST70 and tends to be overlooked by many vintage amplifier aficionados. I think the main reason this is the case is that there isn't a large price difference between the two units, and with a tube rectified power supply, power choke, bias system and twice the wattage, it's hard not to want to step up to the ST70. For those of us with relatively sensitive speakers, the ST35 is a nice little unit with a small footprint and more than ample power (17.5 watts x 2). I've also read from more than one source that the ST35 is the best sounding of the Dynaco units stock, for whatever that's worth ;)
Because there are a lot less ST35s floating around, there aren't really any boards with modern circuits that fit into the original chassis. Shannon Parks of DIYTube has created a brand new circuit board that is similar to the ST35 circuit with some modern sensibilities if one would like to go that route. I prefer the looks of the original ST35 chassis myself, with the exposed PCBs on the ends. For this, I turned to Dynakit Parts. Dynakit Parts is a company based in Clifton, New Jersey and has an impressive selection of old school reproductions of Dynaco products. The kits are about as close to the originals as you can get, from the can capacitor to the screw-down terminal strips.
Rather than purchasing the whole kit, I purchased a number of the parts a la carte, as I was interested in adding a little bit of customization to the kit with a power choke, power switch, triode / ultra-linear switches, a C8 power inlet for a custom C7 removable power cord and a number of boutique parts. I also added the ST35-BCU bias control upgrade kit which fits nicely above the chassis. As stated on the Dynakit site: The ST35-BCU employs an adjustable fixed bias circuit which allows for user adjustment of the bias setting of each (EL84) output tube via (4) separate on board precision bias pots. This allows you to not have to purchase a matched set of power tubes. And even if you did purchase a matched quad, power tubes tend to age differently, so they can be adjusted after this occurs.
Kevin of Dynakit Parts was working on a brand new brown PCB board for the ST35 when I contacted him. I really appreciate it when a company isn't resting on their laurels but investing in new products and innovations. The new PC-13 boards from Dynakit is made from aerospace grade 240 degree Centigrade brown Polymide mil spec material and features silk screened component designations. The brown will go very nicely with the vintage patina powdercoat scheme that I had planned. I wish the bias board was made of the same nice brown material, but we can't have it all, can we? ;)
I elected to populate the small driver / power boards with Kiwame carbon film resistors, Obbligato and Mundorf Supreme film capacitors and Teflon and ceramic tube sockets (the Teflon sockets even have beryllium copper contacts). The caps fit pretty much perfectly, although the Mundorfs will have to be mounted once the boards are mounted due to sizing constraints. The Dynakit build calls for nicer silver mica capacitors in place of the ceramic disc capacitors that were in the older units. These can be found just about anywhere (Mouser, Digikey, Partsconnexion, Handmade, etc.).
I chose to go with the cadmium metal chassis as opposed to the newer stainless steel version as the chassis is going to be powder-coated; no need to pay extra for that chromed-out finish when no one's going to see it ;) Below you will see the chassis, I've enlarged the holes to fit the Cardas binding posts and RCAs, and the center hole has been enlarged to hold a piece of FR4 material that will then hold the C8 inlet in place. I then gave the chassis a nice sanding and labelled it for the powder-coater.
One thing I would be painting myself was the power choke. A choke is a nice cheap upgrade for the ST35 and helps reduce ripple in the power supply. A number of people have used the C354 to replace the 50 ohm resistor, I chose a Hammond 156R with 56ohms DCR, which is pretty much the equivalent. Chokes tend to be on the ugly side, so if they aren't hiding in the chassis (there's absolutely no room in this case), they need to be dressed up a bit. I was prepping two at once, one for the ST35 and one for the Millett Jonokuchi.
The first step in this process is to sand down the metal frame on the choke. Then painters tape is cut and applied to mask off the inside. I've seen some builders just paint the whole thing, but I don't really care for that look.
Next I apply two layers of primer, one per hour, then multiple coats of Hammertone paint. It can be difficult to get the Hammertone paint to lay correctly without making the coat too thick. Any over-spray is corrected using black permanent ink.
Once dry, I measured and cut some strips of black leather and used some epoxy to keep them in place, wrapping around the spool of the choke. I use a couple layers of leather when possible to give the spool a fuller look, it's more aesthetically pleasing.
UPDATE (6/19/11): The parts arrived for the ST35 power / driver boards, so I went ahead and populated everything except for C4 and C5, which will be 0.1uF Mundorf Supremes that will hang off the board just a bit and will need to be installed once the boards are fastened to the chassis. C1 was not used per Bob Latino's suggestion as its purpose is DC input blocking and nearly all modern-day preamps already have a DC blocking output cap, so I used a pair of thick leads to short C1. As you can see below, the Teflon tube sockets have blue PCB boards installed to ease the soldering process. The sockets had a rather long ground pin that I trimmed down and sanded smooth as there would have been a clearance issue in the height challenged chassis.
UPDATE (7/8/11): The chassis is pack from the powder-coater so I was able to fit the boards in place. I opted to install them rotated 180 degrees as I wanted the RCAs on the rear of the chassis and there wasn't sufficient clearance with the power tube sockets blocking the way. I took some generic gold-plated RCAs from my parts bin and trimmed off the back with a cutting disc, rendering them nonfunctional but small enough to squeeze between the tube socket and the chassis front, simply for the sake of aesthetics. I was also able to position the painted Hammond filter choke, attach the Cardas copper binding posts and install the Cardas rhodium plated RCA jacks. Also installed was the large silver multicap and the bias control board from Dynakitparts.
In the interest of making things convenient, I installed a small 6A SPST toggle switch on the front panel of the chassis so the amp can be powered on and off conveniently.
The ST35 Bias Control Unit from DynakitParts makes use of an adjustable fixed-bias circuit, allowing for adjustment of the bias setting of each EL84 power tube via four separate precision bias potentiometers.
UPDATE (7/28/11): The transformer bell-ends arrived back from the powdercoater and were reattached to the iron with brass hardware. Rather than using the cut transformer wire, I prefer the Kimber TCSS Teflon wire for all extraneous point-to-point wiring. The dielectric doesn't melt, it's a little thinner so it's easier to route, and I'd imagine the copper's of a higher purity. I opted to add a set of three 1uF 630V Solen film capacitors as bypass caps for the can capacitor. The Solen film caps are only a couple bucks a pop and have the potential to add refinement to the power supply. It's a narrow fit in the ST35 case, no room for zip tie mounts for the caps.
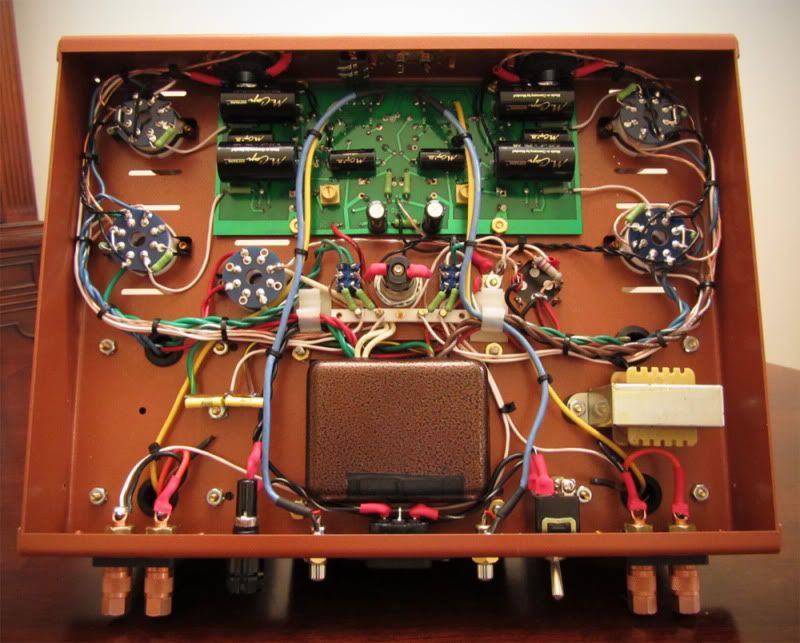
The wiring was finalized by adding a pair of DPDT switches to manage the triode and ultralinear switching. This was wired based on the following advise from Bob Latino and Tazsmonn on the DynacoTubeAudio Forum: Remove green or green white wire from pin #9 of each tube and solder to separate poles of DPDT switch on the same end, Solder wire from pin #9 to center pole of DPDT switch, Solder 100 ohm [resistor] from pin #7 to DPDT switch opposite end from green or green white wire, All wiring to and from switch side must be to same tube.
Now that the wiring is complete, a final checkout of the circuit is performed, tubes and installed, the unit is powered on and the tubes biased using the ST35-BCU. The tubes installed were Mullard EL84s and Phillips EGC 12DW7. The sound is quite excellent, very resolving and holographic imaging. It actually sounds quite "hifi" for a circuit from the early 1960s. I could use a tiny bit more bass, but I was listening on a small set of Tektons with 4" Fostex full range drivers. Here's some additional progress pics:
UPDATE 8/8/2011: I was able to have a pair of custom engravings made for the unit. A 1" gold circle with the word "Dynaco" engraved in black and a small rectangle with a Dynaco Stereo 35 logo that I made in Adobe Illustrator. These are the final touch.
To recap, the customizations to the kit were as follows:

Because there are a lot less ST35s floating around, there aren't really any boards with modern circuits that fit into the original chassis. Shannon Parks of DIYTube has created a brand new circuit board that is similar to the ST35 circuit with some modern sensibilities if one would like to go that route. I prefer the looks of the original ST35 chassis myself, with the exposed PCBs on the ends. For this, I turned to Dynakit Parts. Dynakit Parts is a company based in Clifton, New Jersey and has an impressive selection of old school reproductions of Dynaco products. The kits are about as close to the originals as you can get, from the can capacitor to the screw-down terminal strips.
 |
| Dynakit Parts ST35 Kit |
 |
| The original Dynaco ST35 Schematic |
Rather than purchasing the whole kit, I purchased a number of the parts a la carte, as I was interested in adding a little bit of customization to the kit with a power choke, power switch, triode / ultra-linear switches, a C8 power inlet for a custom C7 removable power cord and a number of boutique parts. I also added the ST35-BCU bias control upgrade kit which fits nicely above the chassis. As stated on the Dynakit site: The ST35-BCU employs an adjustable fixed bias circuit which allows for user adjustment of the bias setting of each (EL84) output tube via (4) separate on board precision bias pots. This allows you to not have to purchase a matched set of power tubes. And even if you did purchase a matched quad, power tubes tend to age differently, so they can be adjusted after this occurs.
Kevin of Dynakit Parts was working on a brand new brown PCB board for the ST35 when I contacted him. I really appreciate it when a company isn't resting on their laurels but investing in new products and innovations. The new PC-13 boards from Dynakit is made from aerospace grade 240 degree Centigrade brown Polymide mil spec material and features silk screened component designations. The brown will go very nicely with the vintage patina powdercoat scheme that I had planned. I wish the bias board was made of the same nice brown material, but we can't have it all, can we? ;)
 |
| Brown Polymide boards with a few parts in place |
I chose to go with the cadmium metal chassis as opposed to the newer stainless steel version as the chassis is going to be powder-coated; no need to pay extra for that chromed-out finish when no one's going to see it ;) Below you will see the chassis, I've enlarged the holes to fit the Cardas binding posts and RCAs, and the center hole has been enlarged to hold a piece of FR4 material that will then hold the C8 inlet in place. I then gave the chassis a nice sanding and labelled it for the powder-coater.
 |
| A few chassis mods and a bit of sanding prep |
The first step in this process is to sand down the metal frame on the choke. Then painters tape is cut and applied to mask off the inside. I've seen some builders just paint the whole thing, but I don't really care for that look.
 |
| Chokes masked off with painters tape |
 |
| Chokes painted with copper Hammertone paint |
Once dry, I measured and cut some strips of black leather and used some epoxy to keep them in place, wrapping around the spool of the choke. I use a couple layers of leather when possible to give the spool a fuller look, it's more aesthetically pleasing.
 |
| Completed chokes with leather wrapping the spool. |
UPDATE (6/19/11): The parts arrived for the ST35 power / driver boards, so I went ahead and populated everything except for C4 and C5, which will be 0.1uF Mundorf Supremes that will hang off the board just a bit and will need to be installed once the boards are fastened to the chassis. C1 was not used per Bob Latino's suggestion as its purpose is DC input blocking and nearly all modern-day preamps already have a DC blocking output cap, so I used a pair of thick leads to short C1. As you can see below, the Teflon tube sockets have blue PCB boards installed to ease the soldering process. The sockets had a rather long ground pin that I trimmed down and sanded smooth as there would have been a clearance issue in the height challenged chassis.
 |
| ST35 boards mostly populated and ready for installation |
UPDATE (7/8/11): The chassis is pack from the powder-coater so I was able to fit the boards in place. I opted to install them rotated 180 degrees as I wanted the RCAs on the rear of the chassis and there wasn't sufficient clearance with the power tube sockets blocking the way. I took some generic gold-plated RCAs from my parts bin and trimmed off the back with a cutting disc, rendering them nonfunctional but small enough to squeeze between the tube socket and the chassis front, simply for the sake of aesthetics. I was also able to position the painted Hammond filter choke, attach the Cardas copper binding posts and install the Cardas rhodium plated RCA jacks. Also installed was the large silver multicap and the bias control board from Dynakitparts.
 |
| Getting started assembling the parts on the chassis |
 |
| A 3 Amp power switch installed on the front of the unit |
 |
| Wires run to the Bias Control Unit from DynakitParts |
The initial wiring was completed using Kimber TCSS 19 gauge stranded copper in teflon dielectric. I opted to drill out the area originally designated for the fuse holder and the cable in the interest of fitting a C8 power inlet. Because the re-purposed real estate on the chassis back was a little too large for the C8 inlet, I mounted it to a piece of FR-4 material and then mounted the combo to the chassis. This adds a degree of convenience, allowing a removable C7 power cord to be used to power the amp. The fuse was then moved inside the unit and mounted to one of the chassis braces, really a perfect place for it in my humble opinion. Grounding lugs were added to both chassis braces to connect to the RCA grounds (the Cardas RCAs are insulated from the chassis unlike the stock Dynaco RCAs) and the negative connector of the speaker binding posts.
 |
| Initial wiring of the ST35 complete |
 |
| Transformers wired in place, Solen bypass caps added |
 |
| Triode mode switches wired up |
 |
| Dynaco ST35 front view |
 |
| Final Dynaco ST35 back view |
 |
| Dynaco ST35 side view |
UPDATE 8/8/2011: I was able to have a pair of custom engravings made for the unit. A 1" gold circle with the word "Dynaco" engraved in black and a small rectangle with a Dynaco Stereo 35 logo that I made in Adobe Illustrator. These are the final touch.
 |
| Final Dynaco ST-35 front view |
 |
| Final Dynaco ST-35 top view |
 |
| Engraving detail on quad-cap |
 |
| Final Dynaco ST-35 rear view |
To recap, the customizations to the kit were as follows:
- Teflon tube sockets with Beryllium copper contacts
- Ceramic gold plated driver tube sockets
- Mundorf and Obbligato driver board capacitors
- Solen power bypass caps
- Kimber TCSS internal wiring
- Kiwame / Koa Speers carbon film resistors
- Hammond 156R Choke - 56ohms DCR
- Dynakit Parts ST35 BCU (Bias Control Unit)
- Front power switch
- Triode / Ultralinear Switches
- Cardas RCAs and Binding Posts
- C8 power inlet jack with custom C7 power cord
- Custom powdercoat color-scheme
- Alternate fuse holder and placement
- Custom Brass Engravings
The Fine Print:
Please remember that building circuits and performing circuit modifications can be dangerous to you and/or your surroundings and should only be performed by a certified technician. The owner of this blog and all associated parties can not / will not be held responsible if you attempt a build or modification posted above and cause physical harm to yourself or your surroundings. Many electronics contain high voltages that can kill, and mods, if performed improperly, can be a fire hazard. Please keep this in mind.