Zynsonix Link

Showing posts with label HeadFi. Show all posts

August 17, 2022

Spirit Torino's Super Leggera Headphone Review

I’ve been into HiFi audiophile headphones for a couple of decades now, and the hobby today is probably the biggest it’s ever been. While headphones were invented in the late 19th century, those intended for musical reproduction got their start in the late 50s with the Koss Stereophone in 1958. Koss released numerous quality headphones for decades and remained very popular. In the early 90s, higher-end headphones were having a renaissance of sorts with Sennheiser making the groundbreaking HD580, Grado releasing their SR series, and Sony introducing stellar products like the CD3000. In the 2000s we had AKG release the K701s, Sennheiser the HD600s, Grado the metal-bodied SR-325s, and Beyerdynamic refreshing and marketing its DT series for recreational listening. Into the 2010s and the options have exploded far beyond belief with many more players in the game and brands accommodating many different tastes. One company that really stands out to me is Grado, a small family-run business operating out of New York. 

Grado (pronounced gray-doh) is what I’d consider a conservative business that hasn’t made many changes as the headphone sector has turned into a whirlwind of competition. If you look at the SR125 which was introduced in 1993, it looks nearly the same today, and I’d imagine it is still produced by hand the same way it was back then. There are the plastic grills with discs in the middle noting the model number, plastic gimbals and angled metal rods attaching them to the plastic rod-blocks marked “L” and “R” and looking inside you can see the driver and the wires running to it soldered by hand.

The Grado Hemp Headphones
There’s something very charming about small businesses making hand-made goods in this day and age where everything is becoming automated; that’s probably what I like best about Grados. They refuse to conform and continue their own path, stubbornly ignoring pleas for removable cables and more comfortable pads. It makes them polarizing, with some people dismissing them as cheap looking or antiquated compared to new planar magnetics and dynamic headphones that fully cover the ears, while others embrace their quirks and often buy more than one.

If you haven’t heard a Grado before, they have a general house sound. That would be a little light in the lowest bass, fun punchy sub bass, neutral mids and crisp, forward high energy in the upper mids and highs. As you go up the line they become more resolving and refined (generally). New additions to the stable such as the limited Hemp release and the RS-1X which incorporates hemp in the wood body are voiced a little more warmly which makes them great for longer listening sessions free of fatigue. Just about anyone who’s listened to a Grado will tell you they are great for rock music as you can really feel the energy come through the music.  

So if you try to distill what makes a Grado a Grado and you remove all the intangible brand-equity that comes with a family business making hand-made goods, you’re going to be left with the fairly unique use of rudimentary gimbals with fixed rods that are inserted into rod-blocks which are held by the headband, along with 44-50 millimeter dynamic drivers in a smaller driver cup that doesn’t fully cover the ears. 

Unique engraving options

Andrea Ricci, a fellow Grado enthusiast, started modding headphones using Beyerdynamic and Grado parts in the late 2000s. Creating a company called Spirit Torino, he began offering items for sale in 2016 including the Spirit Labs MMXVI which were Grados with custom engraved metal cups, a new headband, specially tuned SR80e drivers and a custom cable. Other headphones were to come in the following years like the Twin Pulse with isobaric motor unit. Now a full-fledged company with more mature products and distribution outside of Italy, Spirit Torino has become a headphone company that audiophiles should consider when selecting among the other high-end brands available.

While once a curiosity, I was finally able to obtain a demo pair of Spirit Torino headphones for audition. The Super Leggera, which probably resemble Grados the most out of Andrea’s offerings, are nearly all metal, from the cups, the rod-blocks, the rods, the driver grill, etc. The cups are partially anodized and have been CNC engraved. There is a generously sized suede headband with visible stitching and the pads protrude out the way a Grado G cushion would. The pads however are fenestrated suede which are probably about the size of Beyerdynamic DT series pads and look like an offering from Dekoni. The rod-blocks utilize two Allen screws, one holding the headband, and the other allowing you to set the position of the rod more permanently. The second feature is especially important given the weight of the cups, and something that would be welcome on Grado’s larger metal cupped models.


The Spirit Torino with luxurious suede headband and handy locking screws 

These features, along with the weight, come together to give a sense of quality / luxury. Another welcome feature is a removable cable, a feature that really makes far too much sense not to include. Everyone is using different single ended or balanced connectors, everyone has a different space between them and their gear, and if you have pets or are just hard on your gear the cable will likely get damaged, so an easy replacement goes a long way.  

If you like customization, you’ll be very pleased that Spirit Torino headphones come in a variety of different color cups and headbands. Plain black doesn’t get to have all the fun like usual, with vibrant reds, blues, and intricate engravings adorning some models. I get the impression that Andrea really enjoys the CNC machine as so many of the parts have been fashioned with it. I believe Grado also uses a CNC machine for cutting/engraving, however it is limited to the cups.

Beautiful CNC work everywhere you look.

So that’s all good and well, but how do they sound, and how do they stack up against Grados?

This review will be comprised of my initial audition of the Super Leggera, and after I had sent over to Andrea in Italy to have it updated to the latest revision.

My first impressions of the non-upgraded version were very good. I found I liked them best with Todd the Vinyl Junkie (TTVJ) flat pads. Sub-bass was very powerful and succinct, larger than life and probably a bit too much for those looking for a balanced headphone. There was a strong authority to entire sound range where everything was dominant and in-your-face (or ears in this case). The presentation was full, warm, and not much in the way of soundstage. The clarity of the highs is usually reduced a little bit when using the flat pads with Grados, which is also the case here, but many of us like the tradeoff. The early version Super Leggeras are definitely a fun sounding headphone with the flats, but clearly not as refined as something like a Focal Utopia.

Upon speaking with Andrea who runs Spirit Torino, he let me know that there are a couple of important updates that have been added to the units, including a “neodymium magnet enhancement of 3.8 kg” on each driver, and a “Nen Ventilarion” pad system, which may just be a bad Google translation of ventilated. After a short trip to Italy, these two changes had a profound impact on the sound, which went from Ibiza dance club to something more akin to a symphony hall and reminding me of the Grado GS presentation.

If you’re not familiar with the GS-2000e, it doesn’t have the peaky upper midrange that defines the Grado “energetic” house sound, but there is a slight peak there. There is also a pronounced sub-bass energy that seems present with nearly all Grados. The overall sound is both crisp and full. Comparing the GS-2000e ($1,399 USD MSRP) to the Super Leggera ($1,600 USD), the transition from subbass to midrange is the most stand-out change (while still being a little on the punchy). I believe adding the weight to the back of the driver assists to make the transition much smoother. Also present was a wider soundstage, while not as wide as something like the hybrid driver Enigma Acoustic Dharma headphones, there was more of a palpable space, likely created from the new ventilated / fenestrated pads. Other than that, the sound seems a little crisper when it came to guitars, but relatively similar.

You might be wondering why changing headphone pads makes such a marked difference. The sound of dynamic drivers like Grado and Spirit Torino can vary wildly depending on how close they are to your ear. As the driver gets closer to the ear, bass and fullness increase dramatically while treble clarity suffers and soundstage shrinks, and when it’s pulled away all these facets are reversed. Thus, it’s very important to get the position right. I can tell Spirit Torino went to great lengths to not impair the sound by have a very thin fabric between the ear and the driver that is barely there and having the circumaural pads (pads that cover the ears completely) get the driver at a very specific distance from the ear canal. 

Note the perforated cups and attractive CNC-cut grill

The verdict? Honestly, I liked both the original and latest version of the Super Leggera for different reasons. The original made thumping electronica and synthwave wildly exciting, and the latest version worked much better for acoustic guitar and indie rock genres I enjoy such as shoegaze and prog. Compared to the GS-2000e the latest version offers a similar sound with a little more refinement and is built so impressively it’s hard not to gawk at them before putting them on your head. At $1,600 USD I believe it is priced competitively for the sound quality, and very reasonable when you consider the build quality.

Justin of Headamp has been in the headphone hobby 20+ years now and is the U.S. distributor for Spirit Torino. I’ve met him at a few meets and he’s a great fellow. Drop him a line at Headamp.com if you’d like to check out this exciting new offering in the headphone world. 


Please note the Spirit Torino Super Leggera was provided to Zynsonix Audio LLC at a discounted rate for an honest review.

March 18, 2022

Headphone and Speaker Switchboxes for HiFiMan Susvara

I wanted to show a few different solutions for headphone and speaker switchboxes for the HiFiMan Susvara headphones. Everyone knows these are basically the least sensitive headphones on the market so they need to be powered with a speaker amp to sound their best. Speaker amps weren't really made to power 60 ohm headphones, so it's nice to keep them happy with a load closer to what they were designed to output. Also, if you are using multiple amps or one amp for both headphone and speaker duty, it can be pretty annoying to have to get behind your equipment and swap the spades or bananas every time you need to switch. Thus the need for high quality switches that won't degrade the signal. 


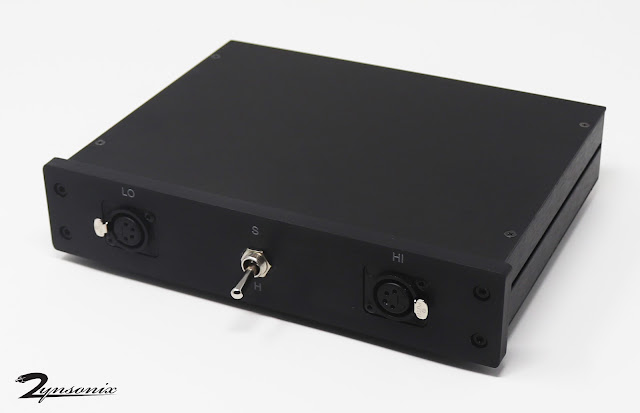
First use case is a gentleman who likes very minimalist looking equipment, thus the limited printed letters on the front. He wanted to be able to use one amp and switch between his Susvaras and his speakers, so simple single switch operation. The headphone outputs are for low sensitivity (Susvaras or HE-6) and high sensitivity for regular headphones. 

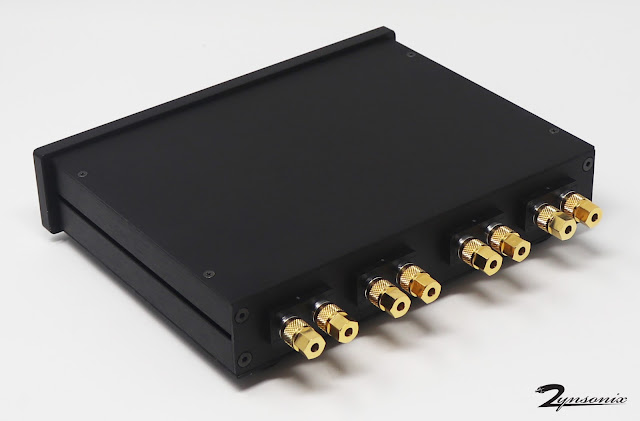
This chassis has a 10mm front panel and 2mm for everything else so it has a nice weight to it. This is good for those of you with thick speaker cables. 10mm really has to be machined/milled, most panel mounted parts aren't compatible. In this case we milled so the 4 pin XLRs could be flush mount, and the switch needed some inletting from the back. On the back we have the splendid Cardas CCGS binding posts which are milled copper block covered in gold and rhodium. They're my personal favorite; pricey but you get what you pay for. It also has nice thick aluminum feet with ring dampers but they are hiding underneath. Inside is hand-sleeved high purity soft drawn silver. 


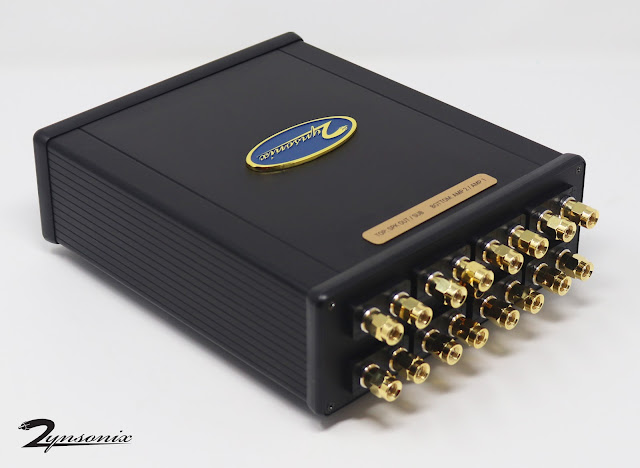
Next we have a slightly more budget oriented build that will allow the user to select one of two amps to either power a pair of speakers or the Susvara headphones. It also has a subwoofer output and an RCA is on the back so the user can ground the chassis to a grounding system if desired.

Engraved brass plates provide identification for the inputs/outputs and functions. This unit utilizes a set of EAR isolation feet.


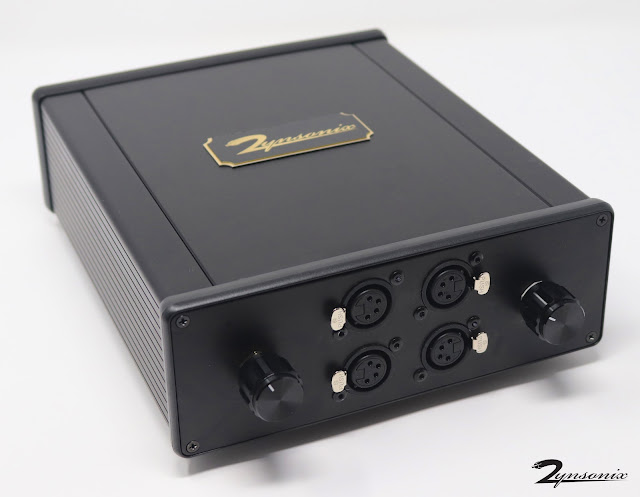
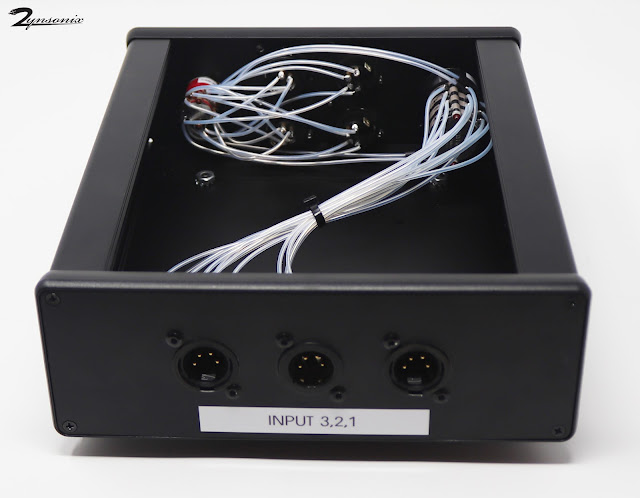
This one isn't necessarily for a Susvara but it allows the user to select between 3 balanced headphone amps and 4 balanced headphones. It features nice Grayhill switches and hand-sleeved high purity soft-drawn silver. The knobs are milled aluminum. The 3 inputs are on the back of the unit. Remember to turn down the amplifiers before switching for two reasons, one tube amps need a load, and two, you could inadvertently switch to a higher sensitivity headphone and the high volume could harm it. 


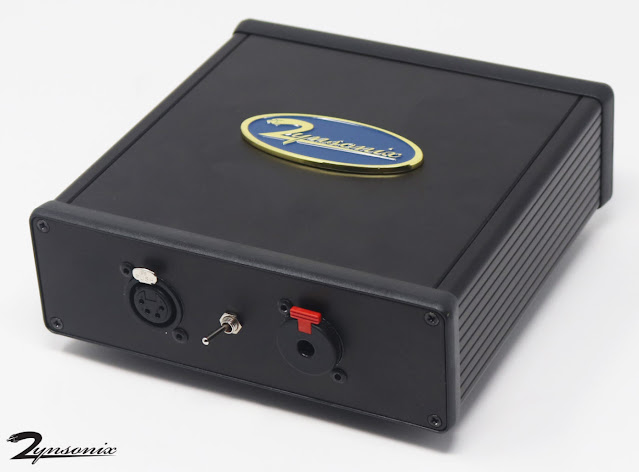
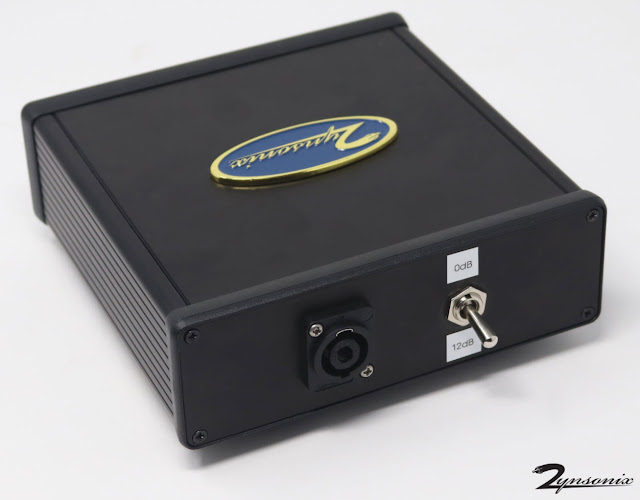
I make a lot of these types of projects but these I found to be some of the more interesting ones. As always you can order a speaker amp to headphone converter that can switch between low and high sensitivity modes, and can switch between 4 pin and 1/4" outputs. This one has a speakON connector for use with a Benchmark AHB2 Amplifier. The Benchmark is a popular choice to use with the Susvaras.


I hope you enjoyed this little gallery. If you need a custom high-end headphone or speaker switcher you know where to find me :) 

If you are trying to power low-sensitivity headphones via a speaker amplifier, please check out the CBOX at Zynsonix.com. It provides a safe consistent load for your amplifier while delivering the juice your headphones need. 


March 30, 2021

Headphone Switchbox in a Compact Chassis

A few years ago I made a headphone switchbox. It was popular enough that I added it for sale on Zynsonix. It uses a standard Hammond chassis which is made in Canada. There have been people looking for a more compact version. Unfortunately Hammond doesn't make a super compact extruded chassis from this line, however a fellow over at HeadFi, ScornDefeat, was able to find a smaller chassis that fits everything (just barely). I believe it's the same chassis as the Objective 2 headphone amp. The size is 3.15" x 5.25" x 1.37" / 80 x 134 x 35mm (LWH) and it comes in anodized black, silver, or blue. 

Rather than Electroswitch in the previous build, the similar 3 pole Lorin CK-1460 is used, and rather than the flashier Neutrik NMJ6HC-S with silver hexagon design, the plain black NMJ3HF-S is used. These are all about the same size so should be interchangeable. 

The knob is a 1/4" Kilo machined aluminum knob. I prefer the selector on the right as it's a little more natural to use the right hand to switch outputs. 

One oddity to note is the chassis that came from Amazon had tapered head silver screws and the chassis screw holes needed to be threaded (Hammond chassis comes pre-threaded). 


If you'd like to build one of these yourself, it shouldn't take longer than 2-3 hours. I recommend solid core 24 AWG wiring for headphone signal wiring inside of a chassis. 

If you'd like one of these built for you for your headphone switching needs, reach out to Zynsonix


May 24, 2018

DIY Headphone Switchbox

It's a head-scratcher why this hasn't been requested before... a switchable headphone output box. I know so many people in this hobby who have more headphones than fingers and toes, so something like this should be commonly on headphone enthusiasts desks across the world! Haha, well maybe not...

Anyway, I had a client approach me who wanted a switchbox so he could switch easily between four headphones. Obviously you don't want to have all four headphones connected at once due to various drive and impedance issues, hence the switch. In addition, the unit should be as transparent as possible as sound quality is paramount in this hobby... so we have a point-to-point 1 to 4 headphone switch, so up to four headphones can be connected simultaneously to an amp, and switching between them is as simple as the click of a switch (and swapping them on your head).

For the box I used a Hammond extruded aluminum box with aluminum endplates, anodized black (everyone likes black). It needed to be a wider model for enough panel real estate for the switch and four 1/4" connectors.

While 4 pole, 3 throw switches are as plentiful as flatulent passengers in airplanes, 3 pole, 4 throw are a little more difficult to find. I used one made in the U.S. by Electroswitch, found on Mouser. If funds permitted we would have gone with Elma/Goldpoint, but this is a great switch with smooth operation. For the 1/4", I went with the super common Neutrik NMJ6HC-S, which is the more attractive jack from their M-Series and is very reliable. It has switching ability as well, but that wasn't needed in this application.  

Here's a few progress pics below: 

Lining up the jacks 

Drilling the pilot holes

Mounting the jacks and switch


Installing the Kilo aluminum knob

Everything was wired up using solid core silver-clad wire in PTFE. I highly recommend this wire for internal chassis work. It sounds excellent and is easy to work with. Just be sure not to be too aggressive when stripping it as if you nick the solid core wire, it can break off and you'll end up with an open circuit. You'll note below the ground is tied to the chassis via a screw and locking solder lug. This is important to ensure the metal chassis has active shielding from noise no matter which output is selected. 

Interior wiring

This is a simple, effective switchbox which hopefully the client will enjoy. 


Final Product


Hopefully you have fun reading this, and who knows, maybe someone will want an 8, 12 or 16 headphone switchbox in the future! You guys will be the first to know ;)

To purchase this product, visit Zynsonix.com


Please remember that building/modifying circuits can be dangerous to you and/or your surroundings and should only be performed by a certified technician. The owner of this blog and all associated parties can not / will not be held responsible if you attempt a build or modification posted above and cause physical harm to yourself or your surroundings. 


May 5, 2015

Beyerdynamic Balanced Removable 4 Pin Mini XLR Mod

A client recently sent me one of my favorite headphones to modify, a Beyerdynamic DT770. The DT770, DT880, DT900, and similarly the T1, T5p, T70, and T90 are all intuitive to work with and respond well to new cables and mass loading.

Beyerdynamic DT770 - Pro 80 ohm version

This DT770 would be getting a removable cable mod, which includes the installation of a mini XLR in the headphone cup so the cable can easier be removed for transport or to perhaps have separate cables for portable and home use. The DT770 has room for a mini XLR jack on both the left and right cups, however this user preferred the simpler single ear input. Since I was already going through the trouble, I wired the headphone for balanced operation just in case he ever switches over to balanced listening in the future. The great thing about mini XLR jacks is they lock, so no need to worry about them slipping out like a 3.5mm or 2.5mm. Also, TRS connectors can loosen over time, however this is not as likely with the mini XLR connectors.

Below is a look at the interior driver. As you can see, the DT770 driver is unique in that it has a felt and plastic ring encircling the center, which reduces the sound wave reflection inside the cups.

DT770 driver and felt/plastic ring


Because the felt and plastic circle reach the plastic backing of the cups, any added mass damping should be clear of interaction. Below you'll note the Dynamat Xtreme installed is a small circle which is measured to fit neatly inside the cup and not cause any clearance issues with the driver. 


Dynamat Xtreme used as mass loading


Beyerdynamics used to come with a round hole, but it's square now that they've revised the manufacturing to some extent. I carefully increased the size of the hole diameter toward the round side of the cup with a Dremel to prevent the plug from getting in the way of the driver. The hole does not have to be absolutely round as the ridge on the mini XLR plugs will cover minor imperfections. 

Dremeled hole for 4 pin XLR mini jack


A three or four pin mini XLR jack can be used. In this case I used a four pin as I wanted the user to be able to upgrade to balanced down the line if he wanted, but in other cases, a three pin can be used as the ground is wired shared as default. Please note the position of the jack, if it is not close to the rounded edge like this is, the driver will not fit back in. Dremeling down the metal casing of the jack where it meets the driver may help a little bit, but will reduce the integrity of the jack if too much is taken off. 

Nice, clean fit


Wire should be run from one side of the headphone to the other as this is going to be single entry. A twisted pair of Zynsonix Xev silver clad wiring is prepped and sleeved with black polyolefin heatshrink tubing. 

Wire to run from one cup to the other


This can be wired however the user prefers, however I used the XLR standard (pin 1 = left +, pin 2 = left -, pin 3 = right +, pin 4 = right -). 

Wired with Zynsonix Xev silver clad wire


Before re-installation, the driver solder tabs are cleaned of the stock solder.

Solder tabs cleaned of original solder


The new Zynsonix Xev wires are installed using fresh Cardas silver content solder and the felt/plastic cups re-installed. 

Driver wired up and ready


The foam is reseated on top of the drivers and the earpads are reinstalled, so we have a nice clean 4 pin mini XLR input on our Beyerdynamic DT770 now. 

Installation of mini XLR jack complete

And finally we have the finished product featuring some cool colors, in this case rust with a black accent, terminated with a Switchcraft gold plated mini 3.5mm plug and a Neutrik / REAN mini XLR. Now these old Pros are ready for some stylish listening! 


I hope you enjoyed this post, please contact Zynsonix if you have a pair of Beyerdynamics (or any other headphone) that you'd like recabled or modified.

For more full-sized Beyer headphone mods, check out the Beyerdynamic T5p Recable and the DT880 Recable.


The Fine Print:
The above steps detailing the modification and re-cabling of a headphone are for entertainment purposes only and not to be performed under any circumstances. The owner of this blog and all associated parties can not / will not be held responsible if you attempt the process posted and cause physical harm to yourself, your surroundings or your property. Please keep this in mind.

July 26, 2013

Donate to a Great Cause and Win!

My good friend and fellow DIY'er Nate Maher (who goes by n_maher on many audio forums) has a wonderful cause that he's working toward. He's going to be raising money for the upcoming 3 Notch Century, which is a challenging and scenic ride through the White Mountains of New Hampshire that benefits the disabled via Northeast Passage, an organization that works with everyone from individuals born with disabilities, accident victims, wounded combat vets, etc. 


I think this is a wonderful cause and encourage you to participate. If you need a little more encouragement, Nate will be raffling off an ECP/Beezar Torpedo headphone amplifier, a pair of vintage recabled AKG K340 headphones, and a custom pair of interconnects. 

Win Nate's Torpedo!
Please head over to: http://www.active.com/donate/threenotchcentury13/natemaher to participate. Each $10 donation is worth a ticket in Nate's raffle. Once you're donated, be sure to send n_maher a personal message on HeadFi with the # of tickets that you ”purchased” via your donation and the name under which you donated to enter his raffle.

About Northeast Passage
Northeast Passage, founded in 1990, is a nationally recognized leader in the provision of innovative therapeutic recreation services. Northeast Passage delivers disability-related health promotion and adapted sports programs throughout New England. All proceeds from this event directly benefit their participants.

Fine Print: The owner of this blog does not have any affiliation with Northeast Passage and/or the Three Notch Century event and will not be personally providing any of the prizes mentioned above. 


August 14, 2012

Decware Zen Head ZKIT3 Portable Headphone Amp

The competitive portable headphone amplifier market can be a difficult one to approach. Manufactures quickly churn out new designs and form factors so quickly that unless you spend lots of time on HeadFi, it's difficult to keep track of them all. Between Ray Samuels, HeadAmp, HeadRoom, iBasso, Fiio, and many others, there are enough offerings to make your head spin.

The company Decware, known mostly for their non-portable, tube-based amplifiers, released a portable headphone amplifier back in 2008. While it was only four years ago, there have been hundreds, if not thousands, of portable amplifiers released since then that may have made some headphone enthusiasts forget about it. It was reviewed favorably many moons ago by HeadFi member Skylab whose opinion I respect, and Decware is offering the PCBs and chassis on his website, so I figured it would be a nice diversion to put one together and have a listen, even if it is a few years old ;)

The Decware Zen Head PCB

One of the nice things about the Zen Head PCB is that there's no SMD soldering to worry about, which is almost a given with more modern portable designs. Just regular old through-hole components here. This may not be the best beginners project as there isn't really any online documentation other than a bill of materials to populate the board. Also unusually, the parts values are printed directly on the board rather than part designations.

Rather than simply ordering the BoM, I opted to try a few other parts. All the resistors are Takman REX carbon film, and there are quite a few of them as seen below.

Takman carbon film resistors - pretty in pink

The capacitors were switched with Nichicon / Wima equivalents. Also added were a pair of gold sockets so the OPA2132P op-amps could possibly be rolled in the future. All other parts remained identical to the BoM except for items that were out of stock and necessitated a substitute. After the population of all the parts the board is quite colorful!

The populated PCB

The chassis is a little long compared to other portable amps as the battery doesn't fit on or over the board, but in a plastic battery holder in the back. Compared to something like Ray Samuel's Shadow, this amp is massive, but it will still fit in your pocket or transport just fine in a case. A pattern was drilled on the top of the case for heat dissipation, although it's doubtful that much will be generated.

Zen Head in PCB in case

I noted that the PCB was a little long and ran into the battery compartment. Since there's no traces at the end of the board, the PCB was sanded down a bit so everything would fit nicely. The battery strap was then soldered in place.

Attachment of the battery strap
Next the front plate needed to be drilled. A template was printed from the Decware site that was printed at actual size (not fit to page, very important!) and taped to the front of the plate. The plate was then drilled using a drill press and the holes de-burred.

Drilled front plate

More to come!


Need a custom cable for your iPhone or portable amp? Check out Zynsonix for some great sounding options.

The Fine Print:
Please remember that building circuits and performing circuit modifications can be dangerous to you and/or your surroundings and should only be performed by a certified technician. The owner of this blog and all associated parties can not / will not be held responsible if you attempt a build or modification posted above and cause physical harm to yourself or your surroundings. Many electronics contain high voltages that can kill, and mods, if performed improperly, can be a fire hazard. Please keep this in mind. 


September 26, 2011

Modifying the Fostex T50RP Headphones

There are many instances in headphone-dom when a headphone has potential that may not have been fully realized by the manufacturer. It's then that the trusty headphone modder wields his magical dremel and goes to work for the good of the audiophile community.

Just that has happened with the Fostex T50RP headphones. Fostex is a Japanese company really known for their specialty drivers (especially full range) and they have some clout in the pro audio industry as well. The T50RP are the flagship model of the Fostex RP lineup (consisting of the T20RP, T30RP and T50RP). Flagship may sound expensive if you're familiar with headphone manufacturers like Sennheiser, Grado or Sony, but these are only $80 or so. An $80 headphone from a company not really known for their headphones may seem kinda humdrum, but the driver housed in the headphone is fairly unique. From the Fostex site: "The newly developed RP Diaphragm improves the overall frequency response ... employing copper foil etched on a polyimide film Neodymium magnet for high sensitivity and excellent transient handling." Bottom line for those who just glazed over, this is an orthodynamic headphone and a smidge cheaper it's ortho-cousins: the HiFiMan HE-5LE ($699) or the Audeze LCD-2 ($945).


The Fostex T50RP

HeadFier Smeggy took it upon himself to extract the best the Fostex T50RP could deliver, removing them from the shackles of under-damped plastic cups and vinyl pads, creating something that would be forever known as the Thunderpants. Smeggy (aka Gary) removes the driver from the headphones and installs it in a well-sealed ported wood enclosure, replaces the pads and cable, installs a leather headband and does a few other tweaks.  

So how does a modified T50RP sound? I have no idea; I'm going to try and build one to find out. My first modus operandi was to locate a set of pretty wood cups that would house the drivers. I turned to a wood turner on HeadFi and commissioned him to build me the cups and baffles as I don't have a lathe to handle such delicate work (for the sake of privacy I won't be providing his contact information at this time).


T50RP wood cups and baffles

T50RP wood cups and baffles, reversed

The first easy bit of work would be to trim a pair of felt circles to drop in the wood cups to prevent sound reverberations and hammer in a pair of brass fittings into the bottom port on the cups. 


I went ahead and did some depth mounting for the screws on the baffles so the pads would sit flat across them. 


Baffles with depth mounted screw holes

They were then sealed, stained and poly-coated, even though they wouldn't be seen once the pads were in place. If anything, it would help preserve the wood and prevent the rough finish from wearing against the pads. 

Stained and sealed baffles

The drivers from the stock T50RP need to be removed, which is about as simple as unscrewing a few screws after removing the pads and snipping the two wires running to the unit. At the recommendation of Sachu, who has also heavily modified his T50RPs, porous tape was applied to the four corner quadrants on the back of the driver. The three plastic screw-holders around the frame were then drilled out and tapped for #4 screws so they could be screwed directly to the new wood baffles.

Porous tape in corner quadrants on driver

There's a bit of a gap between the drivers and the baffles that will need to be sealed, to minimize this gap, a piece of Dynamat Xtreme was trimmed and smoothed to fit around the driver opening.


Dynamat added to driver bracket

Now the baffles will be prepped to accept the drivers. Small holes were drilled to accept the #4 screws and an outline drawn to see where the caulking would need to be. 


Prepped Baffle

I elected to add a bit of speaker grill fabric from PartsExpress to separate the driver from the ear, adding a modicum of comfort and perhaps softening the higher frequencies. The driver surrounds were loaded with speaker caulking (also available at PartsExpress), which is a rubber sealant that performs a bit like blu-tack. This will seal the driver to the baffle. 

Grill fabric attached by adhesive

Grill fabric on the baffle

The drivers are then carefully lined up with the pre-drilled holes on the baffle and screwed in place. The speaker caulk is smoothed around the edge to ensure it's air-tight. 

Drivers caulked to the baffles

Next comes the point where the driver cups are fastened to the headband. Since the original hardware can't be used with the wood cups, new hardware has to be fashioned. I offered Smeggy to purchase a set of his hardware as he does such a nice job with it, but he seems to be tied down with popularity at the moment. So that leaves it up to me. 

The first requirement is a piece that will attach the wood block to the wood cups. Shelf brackets were procured from Home Depot, which were then dremelled, drilled and the holes depth mounted. 

Shelf brackets re-purposed for the T50RPs
Next came the creation of the wood blocks that would act as a pivoting joint between the cups and the headband. The blocks were cut from a spare piece of Red Oak from Home Depot using a jigsaw, then sanded down by hand and the small concave area on the bottom was created using a Dremel sanding wheel at a nice slow setting. The holes were trimmed out on the drill press. Once satisfied with the shape, two coats of oil-based stain were brushed on, then two coats of satin polyurethane. The small hole on the bottom was then threaded for a size six screw.

Wood blocks to fasten the cups to the headband

Finally, the headphone could begin to be put together. Loctite Adhesive was used to ensure the copper colored pipes wouldn't ever slip out of the wood blocks. The gold shelf brackets were screwed to the blocks firmly, but not overly so, as the cups would need the ability to be pivoted back and forth at slight angles.

Wood block swivel room

Now the cable could be soldered to the driver. I prepared a nice high-quality Zynsonix Vray Prime cable made with Cardas copper for the T50RPs. The wire was sleeved with soft black nylon multifilament and terminated with a Furutech FP-704G 1/4" TRS connector and the "Y" split covered with a sleek ViaBlue cover. This was run through the cups and soldered to the terminals. Speaker caulking was then placed where the baffle and cups would come together for sealing purposes, along with the area where the cable enters the cups. Wires are held with a zip-ties as a strain relief system; simple but effective.      

Speaker caulking around the circumference to seal cups

The baffles were then screwed in place with four wood screws each. Care must be taken when screwing into wood as it can strip easily. 


Baffles screwed in place

All that's left is to fit the super expensive Stax Omega II pads and we have a finished headphone!

Brown Stax Omega II pads in place

Finished T50RPs
So, now that they are complete, it begs the question; "how do they sound?" I was actually quite surprised with the quality, given that this headphone started its life as an $80 set of cans. It can easily hold its own against some of the nicer dynamic cans like the Denon D7000. The bass is tight and articulate, the treble very informative but not harsh, and the whole dynamic range has a nice overall clarity that is almost reminiscent of an electrostatic headphone. I would agree with all that I've heard regarding the seal of the headphones. The cups need to be cupping your ears evenly for the best sound. I wish I was able to compare it to the HiFiMan or Audeze headphones, but I haven't been able to audition either as of yet. All in due time.

If you're looking to have your Fostex T-50RPs recabled or damped, or any other headphone, give Zynsonix Audio a shout.

 
The Fine Print:
The above steps detailing the recabling of a headphone are for entertainment purposes only, and not to be performed under any circumstances. The owner of this blog and all associated parties can not / will not be held responsible if you attempt the process posted and cause physical harm to yourself, your surroundings or your property. Please keep this in mind.