Zynsonix Link

Showing posts with label hifiman. Show all posts

April 15, 2022

High-end Custom Audiophile Headphone Cable for HiFiMan Susvaras

High-end Custom Audiophile Headphone Cable for HiFiMan Susvaras

If you are looking for high-end audiophile wire, ultra pure ohno cast copper, aka UP-OCC, should be on your shortlist. The copper is drawn from much larger crystals so it has a much smoother and cleaner appearance under a microscope versus standard oxygen free copper with a more grainy texture. See below: 


Thanks to it's long grain structure, UP-OCC is commonly used for higher-end audiophile cables. But what if we wanted something even better? Zynsonix now has access to ultra pure, ohno cast silver (UP-OCS) wire known for even better conductivity. 

For this post I'll be assembling a Zynsonix UP-OCS Centurian Octet headphone cable for the HiFiMan Susvaras, easily one of the best headphones on the market. The Susvara's are known to be very unsensitive so that's why the Octet formation is recommended to get the extra juice from your headphone amp or speaker amp to the headphones. 

At the start we will need to hand-braid the UP-OCS silver wire, this is a pair of litz quads which will be running in parallel. 


I like to give the cable a nice snug PTFE Teflon wrap to help reduce unwanted vibration and microphonics. 


Next comes the sleeving. We went with ViaBlue's patterned black, red and white patterned sleeving


The next step is to add the Zynsonix blind embossed leather tag and Y-splitter.


And we can terminate the cable with some Cardas Quadeutectic solder, 3.5mm connectors and a Furutech rhodium plated 4 pin XLR for balanced audio. 


This is an extremely high performing audio cable that does the HiFiMan Susvaras justice. It's also relatively light despite the extra conductors thanks to the hand-braided UP-OCS. If you'd like to hear the best your Susvaras can sound, please check out the Zynsonix Imperial Legate. It can be terminated in any balanced or single-ended rhodium connection including 4 pin XLR, dual 3 pin XLR, 6.3mm TRS, 4.4mm TRRRS, 3.5mm TRS, 2.5mm TRRS, bananas/spades, or SpeakON connector for Benchmark AHB2.


March 18, 2022

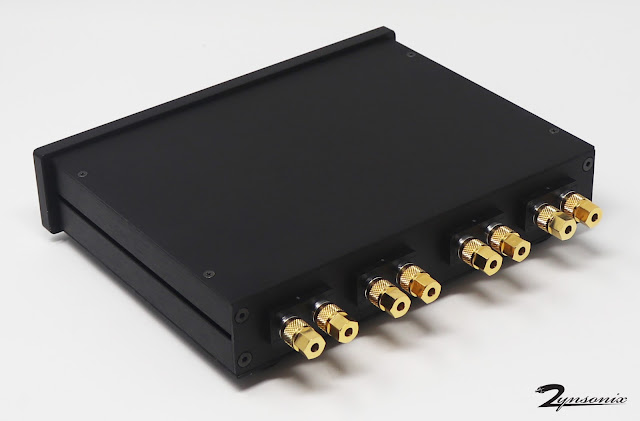
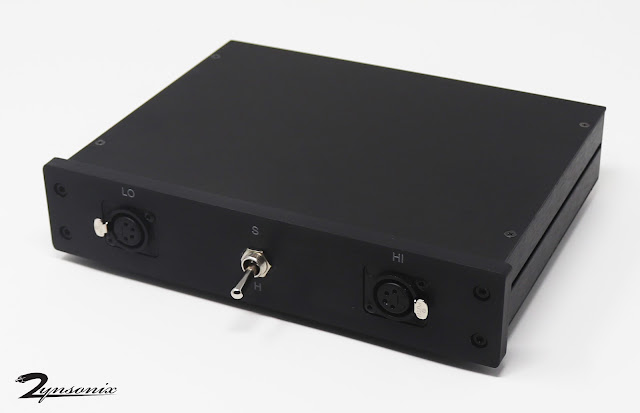
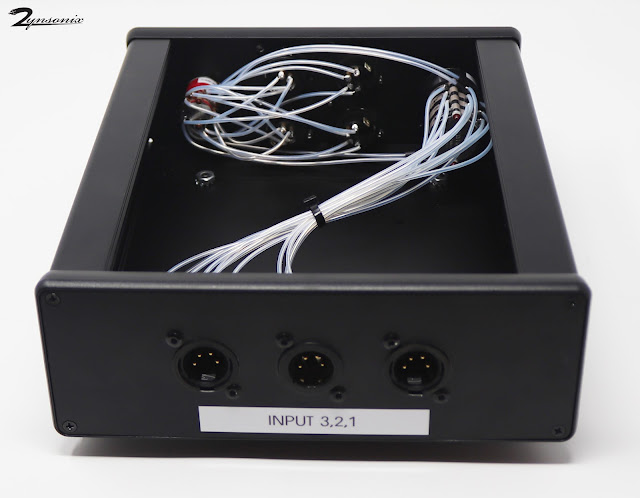
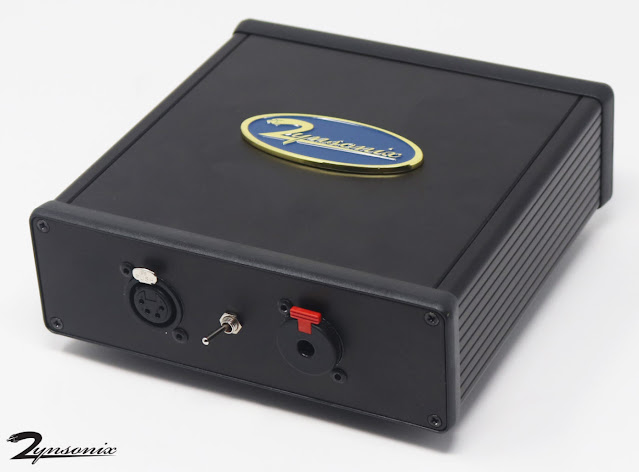
Headphone and Speaker Switchboxes for HiFiMan Susvara

I wanted to show a few different solutions for headphone and speaker switchboxes for the HiFiMan Susvara headphones. Everyone knows these are basically the least sensitive headphones on the market so they need to be powered with a speaker amp to sound their best. Speaker amps weren't really made to power 60 ohm headphones, so it's nice to keep them happy with a load closer to what they were designed to output. Also, if you are using multiple amps or one amp for both headphone and speaker duty, it can be pretty annoying to have to get behind your equipment and swap the spades or bananas every time you need to switch. Thus the need for high quality switches that won't degrade the signal. 


First use case is a gentleman who likes very minimalist looking equipment, thus the limited printed letters on the front. He wanted to be able to use one amp and switch between his Susvaras and his speakers, so simple single switch operation. The headphone outputs are for low sensitivity (Susvaras or HE-6) and high sensitivity for regular headphones. 

This chassis has a 10mm front panel and 2mm for everything else so it has a nice weight to it. This is good for those of you with thick speaker cables. 10mm really has to be machined/milled, most panel mounted parts aren't compatible. In this case we milled so the 4 pin XLRs could be flush mount, and the switch needed some inletting from the back. On the back we have the splendid Cardas CCGS binding posts which are milled copper block covered in gold and rhodium. They're my personal favorite; pricey but you get what you pay for. It also has nice thick aluminum feet with ring dampers but they are hiding underneath. Inside is hand-sleeved high purity soft drawn silver. 


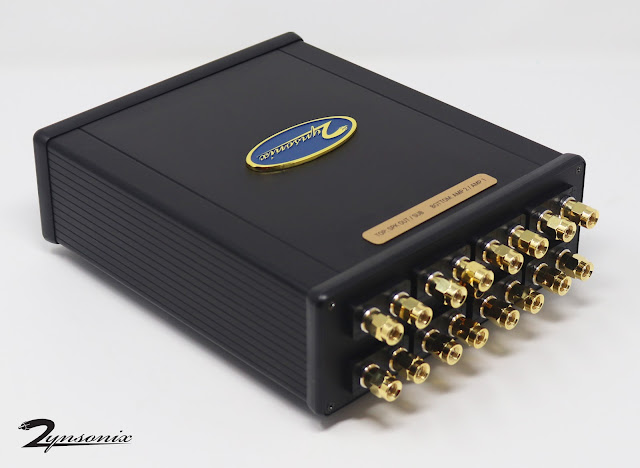
Next we have a slightly more budget oriented build that will allow the user to select one of two amps to either power a pair of speakers or the Susvara headphones. It also has a subwoofer output and an RCA is on the back so the user can ground the chassis to a grounding system if desired.

Engraved brass plates provide identification for the inputs/outputs and functions. This unit utilizes a set of EAR isolation feet.


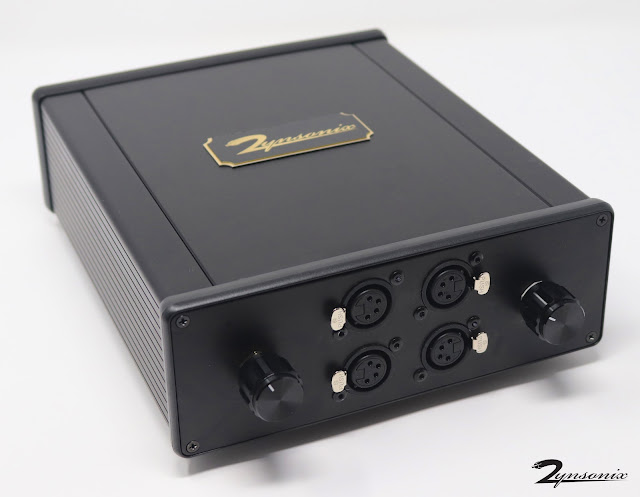
This one isn't necessarily for a Susvara but it allows the user to select between 3 balanced headphone amps and 4 balanced headphones. It features nice Grayhill switches and hand-sleeved high purity soft-drawn silver. The knobs are milled aluminum. The 3 inputs are on the back of the unit. Remember to turn down the amplifiers before switching for two reasons, one tube amps need a load, and two, you could inadvertently switch to a higher sensitivity headphone and the high volume could harm it. 


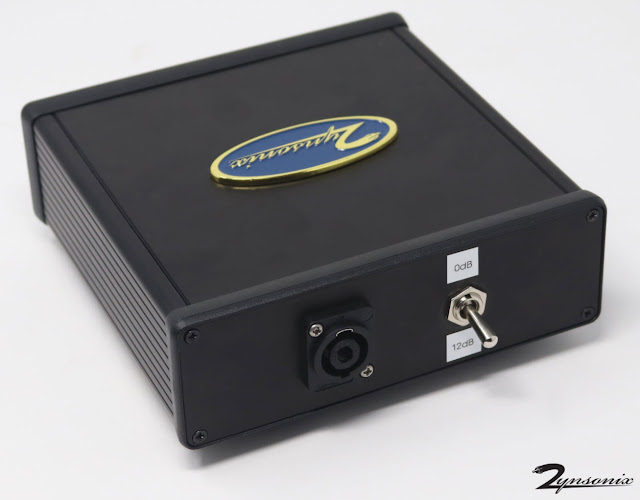
I make a lot of these types of projects but these I found to be some of the more interesting ones. As always you can order a speaker amp to headphone converter that can switch between low and high sensitivity modes, and can switch between 4 pin and 1/4" outputs. This one has a speakON connector for use with a Benchmark AHB2 Amplifier. The Benchmark is a popular choice to use with the Susvaras.


I hope you enjoyed this little gallery. If you need a custom high-end headphone or speaker switcher you know where to find me :) 

If you are trying to power low-sensitivity headphones via a speaker amplifier, please check out the CBOX at Zynsonix.com. It provides a safe consistent load for your amplifier while delivering the juice your headphones need. 


June 1, 2021

Emotiva BasX A-100 Stereo Flex Amplifier Review

This is a review of the headphone output of the Emotiva BasX A-100 Stereo Flex Amplifier. If you’re not familiar, Emotiva makes some great audio products at incredibly attractive price-points. They offer a host of speakers, headphones, amplifiers, processors, and other gear. I have owned their portable DACs which are a tremendous value; I ended up parting ways for lack of need. They were quite good sounding though and offered a robust build quality. I currently have some of their power equipment which is also well built. If I were a home theater afficionado, I’d likely have even more of their gear.

Emotiva has a value-oriented 2 channel amp called the BasX A-100. Normally it is a speaker amp providing 50 watts per channel into 8 Ohms and 80 Watts per channel into 4 Ohms, which is plenty for most setups. What is also pleasing for those with limited in-house real-estate is that the unit is half width, so 8-1/2” wide x 3.125” high x 15” deep. That saves half of your shelf for another piece of equipment/some headphones or something else.

Perhaps what is most interesting about the A-100 is that it can be used as a high-powered headphone amp. Granted, very few people would need this capability, but it is there. The unit does need to be internally jumpered for this operation as it is unsafe for standard headphones. The output is:

8 Ohms:  50 watts / channel
33 Ohms:  12 watts / channel
47 Ohms:  8.5 watts / channel
150 Ohms:  2.6 watts / channel
300 Ohms:  1.3 watts / channel
600 Ohms:  0.6 watts / channel

So, what headphone owners would be interested in this feature? Owners of low-sensitivity headphones like the HiFiMan Susvara, HiFiMan HE-6 or HE-6se, the HEDDPhones, the Abyss AB-1266, and others.

Normally I use an external box with some high quality resistors to convert a speaker amp’s output for headphones (it has some protections built in for amps with output transformers) but given the low cost of the A-100, it was a no-brainer to at least try it out.

Starting with the good news, the A-100 produced plenty of usable volume with the HE-6se and drove them with spades. There are some caveats though. The first, I noticed the amp takes a bit of time to warm up. When listening immediately, the midrange wasn’t well defined. After 10-15 minutes this seems to go away. Second, I found the sound to be fairly cool/bright and slightly lacking on the low end. This isn’t a big deal if you don’t mind EQing. I found reducing the upper midrange and increasing the low range to help make the sound more agreeable for my personal preferences. If you are listening from a computer, you can use the free program PEACE to make adjustments, if not, you can pick up something like the JDS Labs Subjective3 or the Schiit Loki. Neither of these offer an ideal level of control to get the A-100 exactly right (for me), but they are well made and get the job done affordably.


Running the HifiMan HE-6se with the Emotiva A-100


It seems that perhaps the weakest link of the A-100 is its potentiometer (volume control). Early into turning it, there was very noticeable channel imbalance. This seemed to subside quickly as the volume rose; however, it is important to note. A good potentiometer can be costly, so this was likely a price point issue. Given an Alps Blue Velvet (RK27), a frequently used entry-level potentiometer for audio, is around $12 per piece in bulk, it would be very hard to implement at this price level.

You get a lot for your money in terms of parts and build


Overall, the Emotiva BasX A-100 Stereo Flex Amplifier is impressive at its price point given the heft, solid and attractive build, and ability to send 50 WPC to a pair of headphones. Also the internal rectified power supply (no wall wart) is typically reserved for more expensive gear. If you were in the position to have purchased some HiFiMan HE-6 or HE-6se and had very little left over for a suitable amp, this is probably the only game in town, aside from potentially the balanced output of the Schiit Magnius which I haven’t yet tested.

If you were only interested in powering speakers and don’t mind purchasing used gear, you might want to cross-shop an older receiver from a reputable brand like Yamaha, Onkyo, Outlaw, or Denon. If you are DIY-minded, a chip amp like Akitika is a good route to investigate for speakers.   

If you are trying to power low-sensitivity headphones via a speaker amplifier, please check out the CBOX at Zynsonix.com. It provides a safe consistent load for your amplifier while delivering the juice your headphones need. 

February 28, 2013

Speaker Amp to Headphone Cable

I'll be showing off a rather unique audio cable today: a cable that connects the outputs from a speaker amplifier to a pair of headphones. You may be wondering why someone would be using a speaker amp for a pair of headphones. A typical headphone amplifier will output relatively a small amount of power compared to the speaker amplifiers (in small fractions of a watt measured in milliwatts). The Audeze, as well as certain other planar magnetic headphones like the HiFiMan, really benefit from some added wattage to sound their best as they aren't the most sensitive drivers. Hense, in some cases using speaker amplifier can be worthwhile.

Obviously speaker amps were made with speakers in mind, so there will be compromises involved. First and foremost, one can blow out or damage sensitive headphone drivers if turning up the amplifier volume too high. There are also some impedance differences, typically a speaker amplifier outputs at 8 ohms (and in some cases 4 or 16) while headphones will typically range from 35 to 600 ohms. Another factor to consider is that speaker amplifiers may not have a quiet black "background" when used with headphones due to noise, magnetic flux from the transformers or other reasons. Even still, with all of these factors, many audio enthusiasts still prefer listening through their speaker amp.

I'm starting out with some thicker-than-typical wire to braid. Using thicker wire not only assists in delivering a little more juice to the headphones but makes the soldered (or screwed in some cases) connection to the spades or bananas at the speaker amp end of the cable stronger. With a thin 24 gauge wire that would typically be used as a headphone cable, the joint would not be able to take as much abuse as a thicker, heavier wire. 

Silver plated copper with a thick dielectric

This wire is braided and an unbalanced Neutrik locking female is soldered in place. Note that an unbalanced connector is okay for use as the speaker amp has shared grounds (the left and right ground are connected with no resistance), otherwise this would not be acceptable and a balanced connector would be required. Note below that the two ground connectors are soldered together to the ground pin.

Braided silver plated copper in PTFE wire

The cable is now sleeved with the typical Techflex brand Nylon Multifilament in the 1/4" size and heatshrink is applied at both ends. I think it's visually appearing how the cable geometry is fully visible thanks to the tightness of the sleeving. The four lengths of wire are left unbraided at the end for the amp-side connections (sometimes the binding posts can be spaced relatively far apart). 

Sleeved with black nylon multifilament

The white wire was then covered with thin black heatshrink to match the color of the rest of the cable. Note that the heatshrink, just like Teflon tubing, can be resistant over long distances and can require a bit of patience. Once in place, a heat gun is used to shrink it down by starting at one end and moving to the other to avoid air bubbles getting trapped in the middle. 

Speaker ends being prepared

Now the spades could be soldered on. These particular spades are made by LOK and available at Homegrown Audio. They're gold plated and feature a high copper content (over 68%) and fit a 1/4" or 3/8" binding post. Each connector is labelled "L" for left, "R" for right and "G" for ground.


Below are photos of the final cable

Completed cable


And here is an example of the same type of cable for balanced operation. this particular cable uses a Neutrik locking female and rhodium plated spades.

Balanced 4 pin cable to rhodium spades

Need one and don't want to mess with a soldering iron? Zynsonix offers custom-made speaker amp to headphone cables (and many others), please contact them for a quote.


The Fine Print:
The above steps detailing the building of a cable are for entertainment purposes only, and not to be performed under any circumstances. The owner of this blog and all associated parties can not / will not be held responsible if you attempt the process posted and cause physical harm to yourself, your surroundings or your property. Please keep this in mind.


September 26, 2011

Modifying the Fostex T50RP Headphones

There are many instances in headphone-dom when a headphone has potential that may not have been fully realized by the manufacturer. It's then that the trusty headphone modder wields his magical dremel and goes to work for the good of the audiophile community.

Just that has happened with the Fostex T50RP headphones. Fostex is a Japanese company really known for their specialty drivers (especially full range) and they have some clout in the pro audio industry as well. The T50RP are the flagship model of the Fostex RP lineup (consisting of the T20RP, T30RP and T50RP). Flagship may sound expensive if you're familiar with headphone manufacturers like Sennheiser, Grado or Sony, but these are only $80 or so. An $80 headphone from a company not really known for their headphones may seem kinda humdrum, but the driver housed in the headphone is fairly unique. From the Fostex site: "The newly developed RP Diaphragm improves the overall frequency response ... employing copper foil etched on a polyimide film Neodymium magnet for high sensitivity and excellent transient handling." Bottom line for those who just glazed over, this is an orthodynamic headphone and a smidge cheaper it's ortho-cousins: the HiFiMan HE-5LE ($699) or the Audeze LCD-2 ($945).


The Fostex T50RP

HeadFier Smeggy took it upon himself to extract the best the Fostex T50RP could deliver, removing them from the shackles of under-damped plastic cups and vinyl pads, creating something that would be forever known as the Thunderpants. Smeggy (aka Gary) removes the driver from the headphones and installs it in a well-sealed ported wood enclosure, replaces the pads and cable, installs a leather headband and does a few other tweaks.  

So how does a modified T50RP sound? I have no idea; I'm going to try and build one to find out. My first modus operandi was to locate a set of pretty wood cups that would house the drivers. I turned to a wood turner on HeadFi and commissioned him to build me the cups and baffles as I don't have a lathe to handle such delicate work (for the sake of privacy I won't be providing his contact information at this time).


T50RP wood cups and baffles

T50RP wood cups and baffles, reversed

The first easy bit of work would be to trim a pair of felt circles to drop in the wood cups to prevent sound reverberations and hammer in a pair of brass fittings into the bottom port on the cups. 


I went ahead and did some depth mounting for the screws on the baffles so the pads would sit flat across them. 


Baffles with depth mounted screw holes

They were then sealed, stained and poly-coated, even though they wouldn't be seen once the pads were in place. If anything, it would help preserve the wood and prevent the rough finish from wearing against the pads. 

Stained and sealed baffles

The drivers from the stock T50RP need to be removed, which is about as simple as unscrewing a few screws after removing the pads and snipping the two wires running to the unit. At the recommendation of Sachu, who has also heavily modified his T50RPs, porous tape was applied to the four corner quadrants on the back of the driver. The three plastic screw-holders around the frame were then drilled out and tapped for #4 screws so they could be screwed directly to the new wood baffles.

Porous tape in corner quadrants on driver

There's a bit of a gap between the drivers and the baffles that will need to be sealed, to minimize this gap, a piece of Dynamat Xtreme was trimmed and smoothed to fit around the driver opening.


Dynamat added to driver bracket

Now the baffles will be prepped to accept the drivers. Small holes were drilled to accept the #4 screws and an outline drawn to see where the caulking would need to be. 


Prepped Baffle

I elected to add a bit of speaker grill fabric from PartsExpress to separate the driver from the ear, adding a modicum of comfort and perhaps softening the higher frequencies. The driver surrounds were loaded with speaker caulking (also available at PartsExpress), which is a rubber sealant that performs a bit like blu-tack. This will seal the driver to the baffle. 

Grill fabric attached by adhesive

Grill fabric on the baffle

The drivers are then carefully lined up with the pre-drilled holes on the baffle and screwed in place. The speaker caulk is smoothed around the edge to ensure it's air-tight. 

Drivers caulked to the baffles

Next comes the point where the driver cups are fastened to the headband. Since the original hardware can't be used with the wood cups, new hardware has to be fashioned. I offered Smeggy to purchase a set of his hardware as he does such a nice job with it, but he seems to be tied down with popularity at the moment. So that leaves it up to me. 

The first requirement is a piece that will attach the wood block to the wood cups. Shelf brackets were procured from Home Depot, which were then dremelled, drilled and the holes depth mounted. 

Shelf brackets re-purposed for the T50RPs
Next came the creation of the wood blocks that would act as a pivoting joint between the cups and the headband. The blocks were cut from a spare piece of Red Oak from Home Depot using a jigsaw, then sanded down by hand and the small concave area on the bottom was created using a Dremel sanding wheel at a nice slow setting. The holes were trimmed out on the drill press. Once satisfied with the shape, two coats of oil-based stain were brushed on, then two coats of satin polyurethane. The small hole on the bottom was then threaded for a size six screw.

Wood blocks to fasten the cups to the headband

Finally, the headphone could begin to be put together. Loctite Adhesive was used to ensure the copper colored pipes wouldn't ever slip out of the wood blocks. The gold shelf brackets were screwed to the blocks firmly, but not overly so, as the cups would need the ability to be pivoted back and forth at slight angles.

Wood block swivel room

Now the cable could be soldered to the driver. I prepared a nice high-quality Zynsonix Vray Prime cable made with Cardas copper for the T50RPs. The wire was sleeved with soft black nylon multifilament and terminated with a Furutech FP-704G 1/4" TRS connector and the "Y" split covered with a sleek ViaBlue cover. This was run through the cups and soldered to the terminals. Speaker caulking was then placed where the baffle and cups would come together for sealing purposes, along with the area where the cable enters the cups. Wires are held with a zip-ties as a strain relief system; simple but effective.      

Speaker caulking around the circumference to seal cups

The baffles were then screwed in place with four wood screws each. Care must be taken when screwing into wood as it can strip easily. 


Baffles screwed in place

All that's left is to fit the super expensive Stax Omega II pads and we have a finished headphone!

Brown Stax Omega II pads in place

Finished T50RPs
So, now that they are complete, it begs the question; "how do they sound?" I was actually quite surprised with the quality, given that this headphone started its life as an $80 set of cans. It can easily hold its own against some of the nicer dynamic cans like the Denon D7000. The bass is tight and articulate, the treble very informative but not harsh, and the whole dynamic range has a nice overall clarity that is almost reminiscent of an electrostatic headphone. I would agree with all that I've heard regarding the seal of the headphones. The cups need to be cupping your ears evenly for the best sound. I wish I was able to compare it to the HiFiMan or Audeze headphones, but I haven't been able to audition either as of yet. All in due time.

If you're looking to have your Fostex T-50RPs recabled or damped, or any other headphone, give Zynsonix Audio a shout.

 
The Fine Print:
The above steps detailing the recabling of a headphone are for entertainment purposes only, and not to be performed under any circumstances. The owner of this blog and all associated parties can not / will not be held responsible if you attempt the process posted and cause physical harm to yourself, your surroundings or your property. Please keep this in mind.