Zynsonix Link

Showing posts with label audiophile. Show all posts

November 21, 2023

Steampunk Modified Bottlehead Crack DIY Headphone Amp

If you're here you're probably a fan of steampunk, DIY audio, or hopefully both. I wanted to show off my buddy Greg's absolutely beautiful Steampunk themed Bottlehead Crack. I guess technically you might not be able to call it a Crack anymore given nearly every piece of the kit has been swapped out, but the amplifier section of the circuit the same, a simple tube buffer design. 

The Bottlehead Crack has been a popular staple for aspiring DIYers thanks to the lowish price and accessible build. Bottlehead includes step by step directions with pictures so you don't need to know how to read a schematic (although it's fairly easy for tube amps as they are typically simple circuits, so I recommend learning if you can). The stock Crack has very few parts and lacks output transformers so most can complete it in a single evening. 

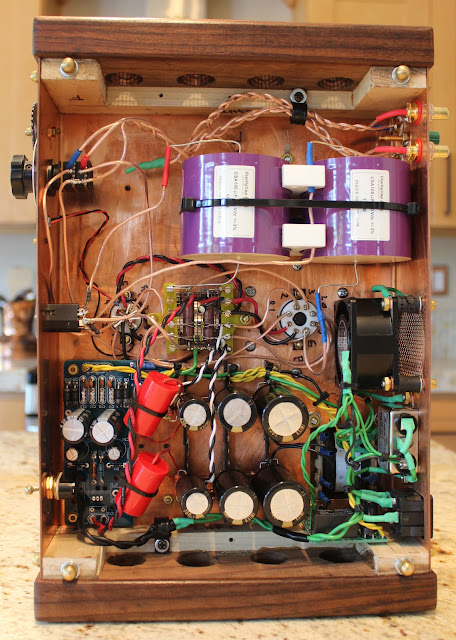
That being said, many users like Greg like to customize their Bottlehead gear, so bespoke wooden bases or unique paintjobs aren't uncommon. Others choose to modify the internals to enhance performance.You will see the frequently replaced electrolytic capacitors with big honkin' film caps. Greg also designed a lovely pair of custom brackets to nestle around the Clarity Caps. 

Lots of audiophile goodies inside

You will see a small power filter near the power IEC socket, then a CRCRC high voltage power filter with Nichicon electrolytics, and near the front switch is a rectifier board. The stock crack has you mount the rectifier circuit on solder tabs around the transformer so this is a nice little improvement. Some people also elect to install ultra-fast diodes as another option. The tube sockets are replaced with the high quality CMC Teflon PTFE sockets which can help dampen tube vibration. These were directly soldered to however you can find PCBs on eBay or AliExpress to make things a little easier. CMC is also now making Bakelite versions of the socket if you are feeling especially vintage.


The stock Alpha potentiometer has been replaced by a higher quality Audio Note version, and Greg let me know he has ample real estate there to mount a larger stepped attenuator. You'll notice this Crack does not have the Speedball upgrade. While the Speedball enhances the performance of the amp as a constant current source for each channel, some people prefer the more "tubey" sound of the stock circuit. I can tell you they are two different flavors and each have their charm. I prefer to mate a Crack with the Speedball upgrade with some warm tubes and a I feel like it's a nice compromise.     

While there are plenty of improvements on the inside of the amp, the outside is the bee's knees. You'll see a polished copper chassis adorned with brass acorn nuts, a custom copper heatsink, the obligatory steampunk gears, and an old fashioned double pole knife switch. There is a reason why knife switches have been relegated to Frankenstein films and not household electronics; they are inherently unsafe and can arc when connected to high voltage. A shame as they look bad ass. This one is just for show.  


You will also notice there transformer is a little larger above. In fact Greg installed a dedicated heater transformer for the tube heater pins rather than requiring the single transformer from the kit to do all the work. 

An earlier version of the unit before the heater transformer was added

The whole unit is a work of art and has great personality. Despite being Steampunk, there were unique choices. For one much of the copper and brass is shiny and polished vs. aged/scuffed. I think it's great to not force yourself into one line of thinking; make it unique, make it you! Now Greg might have to make a pair of headphones that look equally amazing.    

For more steampunk related audio gear, check out this post.

Creator's Bio: Greg Ritacco started mis-wiring audio kits in the 1980's. Gradually fire became smoke and smoke became music. Encouraged by this, Greg briefly pursued a career in audio, first building speakers and later working for Threshold in the "lab". Family pressures and a desire to have his own back yard caused Greg to become more "serious" about his career, and as audio became the stepchild to home theater, and CD's washed vinyl away, Greg gave up and bought a Walkman. These days, he has rekindled his love of LP's and exploding electronics, built a few projects, and he and his daughter share their discoveries of new artists.

Please remember that building/modifying circuits can be dangerous to you and/or your surroundings and should only be performed by a certified technician. The owner of this blog and all associated parties can not / will not be held responsible if you attempt a build or modification posted above and cause physical harm to yourself or your surroundings. Many electronics contain high voltages that can kill, and mods, if performed improperly, can be a fire hazard. 


March 8, 2023

Million Dollar HiFi Audio System and More!

I apologize for the lack of updates this year; everyone has been keeping me quite busy with cables, adapters, custom switchboxes, you name it! A long-time client and buddy of of mine in the area, Eric, has been dipping his feet in the YouTube social media scene and was showing off both his system and his friend Ted (also a client, thank you Ted!) with a million dollar audio system in his modified garage. I think it's a great idea. Who cares if you have to dust some snow off your car if you have a beautiful room full of exquisite audio gear! I wanted to share this eye candy with you all. 

Eric's exquisitely impressive system features some intimidating EgglestonWorks speakers (I believe they are the Ivy Signature) connected via Zynsonix Audio speaker cables to some very classy McIntosh gear:


And Ted's jaw-dropping system with the legendary Wilson Audio speakers, beautiful darTZeel NHB-468 monoblock amps (call me crazy but I love that Iron Man color scheme) and the popular and loved dCs Vivaldi Apex DAC system: 


Ted is utilizing some ultra-low impedance Zynsonix interconnects for the critical connection between the turntable and phono preamp. I hope you enjoy! 


August 17, 2022

Spirit Torino's Super Leggera Headphone Review

I’ve been into HiFi audiophile headphones for a couple of decades now, and the hobby today is probably the biggest it’s ever been. While headphones were invented in the late 19th century, those intended for musical reproduction got their start in the late 50s with the Koss Stereophone in 1958. Koss released numerous quality headphones for decades and remained very popular. In the early 90s, higher-end headphones were having a renaissance of sorts with Sennheiser making the groundbreaking HD580, Grado releasing their SR series, and Sony introducing stellar products like the CD3000. In the 2000s we had AKG release the K701s, Sennheiser the HD600s, Grado the metal-bodied SR-325s, and Beyerdynamic refreshing and marketing its DT series for recreational listening. Into the 2010s and the options have exploded far beyond belief with many more players in the game and brands accommodating many different tastes. One company that really stands out to me is Grado, a small family-run business operating out of New York. 

Grado (pronounced gray-doh) is what I’d consider a conservative business that hasn’t made many changes as the headphone sector has turned into a whirlwind of competition. If you look at the SR125 which was introduced in 1993, it looks nearly the same today, and I’d imagine it is still produced by hand the same way it was back then. There are the plastic grills with discs in the middle noting the model number, plastic gimbals and angled metal rods attaching them to the plastic rod-blocks marked “L” and “R” and looking inside you can see the driver and the wires running to it soldered by hand.

The Grado Hemp Headphones
There’s something very charming about small businesses making hand-made goods in this day and age where everything is becoming automated; that’s probably what I like best about Grados. They refuse to conform and continue their own path, stubbornly ignoring pleas for removable cables and more comfortable pads. It makes them polarizing, with some people dismissing them as cheap looking or antiquated compared to new planar magnetics and dynamic headphones that fully cover the ears, while others embrace their quirks and often buy more than one.

If you haven’t heard a Grado before, they have a general house sound. That would be a little light in the lowest bass, fun punchy sub bass, neutral mids and crisp, forward high energy in the upper mids and highs. As you go up the line they become more resolving and refined (generally). New additions to the stable such as the limited Hemp release and the RS-1X which incorporates hemp in the wood body are voiced a little more warmly which makes them great for longer listening sessions free of fatigue. Just about anyone who’s listened to a Grado will tell you they are great for rock music as you can really feel the energy come through the music.  

So if you try to distill what makes a Grado a Grado and you remove all the intangible brand-equity that comes with a family business making hand-made goods, you’re going to be left with the fairly unique use of rudimentary gimbals with fixed rods that are inserted into rod-blocks which are held by the headband, along with 44-50 millimeter dynamic drivers in a smaller driver cup that doesn’t fully cover the ears. 

Unique engraving options

Andrea Ricci, a fellow Grado enthusiast, started modding headphones using Beyerdynamic and Grado parts in the late 2000s. Creating a company called Spirit Torino, he began offering items for sale in 2016 including the Spirit Labs MMXVI which were Grados with custom engraved metal cups, a new headband, specially tuned SR80e drivers and a custom cable. Other headphones were to come in the following years like the Twin Pulse with isobaric motor unit. Now a full-fledged company with more mature products and distribution outside of Italy, Spirit Torino has become a headphone company that audiophiles should consider when selecting among the other high-end brands available.

While once a curiosity, I was finally able to obtain a demo pair of Spirit Torino headphones for audition. The Super Leggera, which probably resemble Grados the most out of Andrea’s offerings, are nearly all metal, from the cups, the rod-blocks, the rods, the driver grill, etc. The cups are partially anodized and have been CNC engraved. There is a generously sized suede headband with visible stitching and the pads protrude out the way a Grado G cushion would. The pads however are fenestrated suede which are probably about the size of Beyerdynamic DT series pads and look like an offering from Dekoni. The rod-blocks utilize two Allen screws, one holding the headband, and the other allowing you to set the position of the rod more permanently. The second feature is especially important given the weight of the cups, and something that would be welcome on Grado’s larger metal cupped models.


The Spirit Torino with luxurious suede headband and handy locking screws 

These features, along with the weight, come together to give a sense of quality / luxury. Another welcome feature is a removable cable, a feature that really makes far too much sense not to include. Everyone is using different single ended or balanced connectors, everyone has a different space between them and their gear, and if you have pets or are just hard on your gear the cable will likely get damaged, so an easy replacement goes a long way.  

If you like customization, you’ll be very pleased that Spirit Torino headphones come in a variety of different color cups and headbands. Plain black doesn’t get to have all the fun like usual, with vibrant reds, blues, and intricate engravings adorning some models. I get the impression that Andrea really enjoys the CNC machine as so many of the parts have been fashioned with it. I believe Grado also uses a CNC machine for cutting/engraving, however it is limited to the cups.

Beautiful CNC work everywhere you look.

So that’s all good and well, but how do they sound, and how do they stack up against Grados?

This review will be comprised of my initial audition of the Super Leggera, and after I had sent over to Andrea in Italy to have it updated to the latest revision.

My first impressions of the non-upgraded version were very good. I found I liked them best with Todd the Vinyl Junkie (TTVJ) flat pads. Sub-bass was very powerful and succinct, larger than life and probably a bit too much for those looking for a balanced headphone. There was a strong authority to entire sound range where everything was dominant and in-your-face (or ears in this case). The presentation was full, warm, and not much in the way of soundstage. The clarity of the highs is usually reduced a little bit when using the flat pads with Grados, which is also the case here, but many of us like the tradeoff. The early version Super Leggeras are definitely a fun sounding headphone with the flats, but clearly not as refined as something like a Focal Utopia.

Upon speaking with Andrea who runs Spirit Torino, he let me know that there are a couple of important updates that have been added to the units, including a “neodymium magnet enhancement of 3.8 kg” on each driver, and a “Nen Ventilarion” pad system, which may just be a bad Google translation of ventilated. After a short trip to Italy, these two changes had a profound impact on the sound, which went from Ibiza dance club to something more akin to a symphony hall and reminding me of the Grado GS presentation.

If you’re not familiar with the GS-2000e, it doesn’t have the peaky upper midrange that defines the Grado “energetic” house sound, but there is a slight peak there. There is also a pronounced sub-bass energy that seems present with nearly all Grados. The overall sound is both crisp and full. Comparing the GS-2000e ($1,399 USD MSRP) to the Super Leggera ($1,600 USD), the transition from subbass to midrange is the most stand-out change (while still being a little on the punchy). I believe adding the weight to the back of the driver assists to make the transition much smoother. Also present was a wider soundstage, while not as wide as something like the hybrid driver Enigma Acoustic Dharma headphones, there was more of a palpable space, likely created from the new ventilated / fenestrated pads. Other than that, the sound seems a little crisper when it came to guitars, but relatively similar.

You might be wondering why changing headphone pads makes such a marked difference. The sound of dynamic drivers like Grado and Spirit Torino can vary wildly depending on how close they are to your ear. As the driver gets closer to the ear, bass and fullness increase dramatically while treble clarity suffers and soundstage shrinks, and when it’s pulled away all these facets are reversed. Thus, it’s very important to get the position right. I can tell Spirit Torino went to great lengths to not impair the sound by have a very thin fabric between the ear and the driver that is barely there and having the circumaural pads (pads that cover the ears completely) get the driver at a very specific distance from the ear canal. 

Note the perforated cups and attractive CNC-cut grill

The verdict? Honestly, I liked both the original and latest version of the Super Leggera for different reasons. The original made thumping electronica and synthwave wildly exciting, and the latest version worked much better for acoustic guitar and indie rock genres I enjoy such as shoegaze and prog. Compared to the GS-2000e the latest version offers a similar sound with a little more refinement and is built so impressively it’s hard not to gawk at them before putting them on your head. At $1,600 USD I believe it is priced competitively for the sound quality, and very reasonable when you consider the build quality.

Justin of Headamp has been in the headphone hobby 20+ years now and is the U.S. distributor for Spirit Torino. I’ve met him at a few meets and he’s a great fellow. Drop him a line at Headamp.com if you’d like to check out this exciting new offering in the headphone world. 


Please note the Spirit Torino Super Leggera was provided to Zynsonix Audio LLC at a discounted rate for an honest review.
April 15, 2022

High-end Custom Audiophile Headphone Cable for HiFiMan Susvaras

High-end Custom Audiophile Headphone Cable for HiFiMan Susvaras

If you are looking for high-end audiophile wire, ultra pure ohno cast copper, aka UP-OCC, should be on your shortlist. The copper is drawn from much larger crystals so it has a much smoother and cleaner appearance under a microscope versus standard oxygen free copper with a more grainy texture. See below: 


Thanks to it's long grain structure, UP-OCC is commonly used for higher-end audiophile cables. But what if we wanted something even better? Zynsonix now has access to ultra pure, ohno cast silver (UP-OCS) wire known for even better conductivity. 

For this post I'll be assembling a Zynsonix UP-OCS Centurian Octet headphone cable for the HiFiMan Susvaras, easily one of the best headphones on the market. The Susvara's are known to be very unsensitive so that's why the Octet formation is recommended to get the extra juice from your headphone amp or speaker amp to the headphones. 

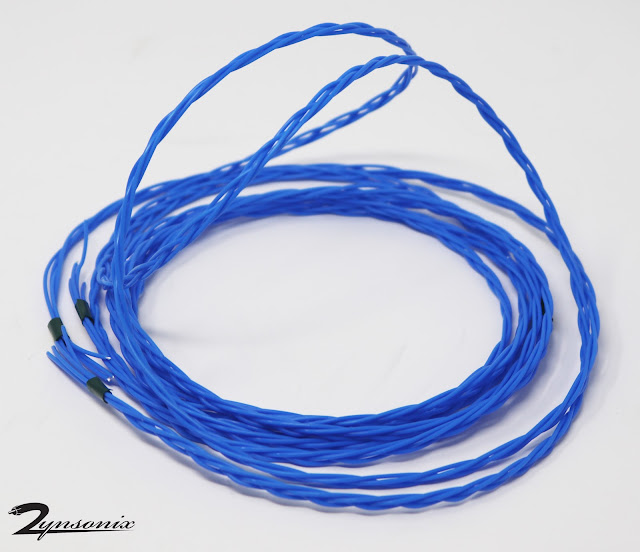
At the start we will need to hand-braid the UP-OCS silver wire, this is a pair of litz quads which will be running in parallel. 


I like to give the cable a nice snug PTFE Teflon wrap to help reduce unwanted vibration and microphonics. 


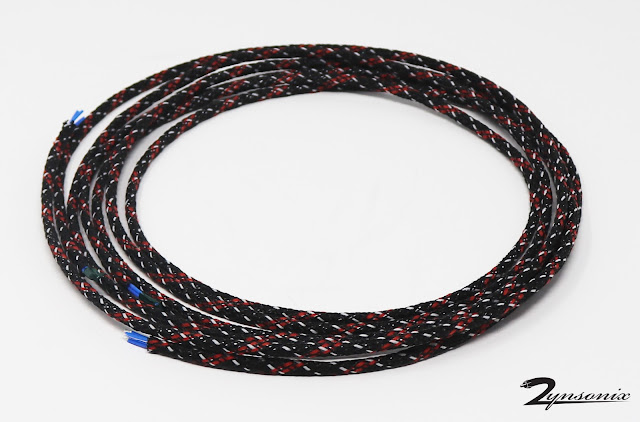
Next comes the sleeving. We went with ViaBlue's patterned black, red and white patterned sleeving


The next step is to add the Zynsonix blind embossed leather tag and Y-splitter.


And we can terminate the cable with some Cardas Quadeutectic solder, 3.5mm connectors and a Furutech rhodium plated 4 pin XLR for balanced audio. 


This is an extremely high performing audio cable that does the HiFiMan Susvaras justice. It's also relatively light despite the extra conductors thanks to the hand-braided UP-OCS. If you'd like to hear the best your Susvaras can sound, please check out the Zynsonix Imperial Legate. It can be terminated in any balanced or single-ended rhodium connection including 4 pin XLR, dual 3 pin XLR, 6.3mm TRS, 4.4mm TRRRS, 3.5mm TRS, 2.5mm TRRS, bananas/spades, or SpeakON connector for Benchmark AHB2.


March 30, 2021

Headphone Switchbox in a Compact Chassis

A few years ago I made a headphone switchbox. It was popular enough that I added it for sale on Zynsonix. It uses a standard Hammond chassis which is made in Canada. There have been people looking for a more compact version. Unfortunately Hammond doesn't make a super compact extruded chassis from this line, however a fellow over at HeadFi, ScornDefeat, was able to find a smaller chassis that fits everything (just barely). I believe it's the same chassis as the Objective 2 headphone amp. The size is 3.15" x 5.25" x 1.37" / 80 x 134 x 35mm (LWH) and it comes in anodized black, silver, or blue. 

Rather than Electroswitch in the previous build, the similar 3 pole Lorin CK-1460 is used, and rather than the flashier Neutrik NMJ6HC-S with silver hexagon design, the plain black NMJ3HF-S is used. These are all about the same size so should be interchangeable. 

The knob is a 1/4" Kilo machined aluminum knob. I prefer the selector on the right as it's a little more natural to use the right hand to switch outputs. 

One oddity to note is the chassis that came from Amazon had tapered head silver screws and the chassis screw holes needed to be threaded (Hammond chassis comes pre-threaded). 


If you'd like to build one of these yourself, it shouldn't take longer than 2-3 hours. I recommend solid core 24 AWG wiring for headphone signal wiring inside of a chassis. 

If you'd like one of these built for you for your headphone switching needs, reach out to Zynsonix


June 12, 2020

Balanced XLR Switchbox - Audio Design HAS-3LB

When it comes to passive balanced switchboxes, there aren't a whole lot of off-the-shelf options out there. It's not uncommon to just build them from scratch with a nice switch and point-to-point wiring as they're not terribly complicated.

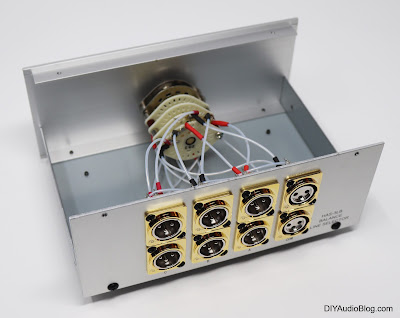
I recently learned of a Japanese audio company called Audio Design that offers a simple but solid 3 in, 1 out balanced switchbox. The outside is a straight-forward design with a dark blue and silver aluminum box with a brushed aluminum front panel. The only control is the single selector knob up front to switch between the 3 outputs. What counts though is the inside, where there is a high-quality Seiden selector switch, some high-quality Neutric XLR jacks, and some thick copper wire... which appears to be 18 or 20 gauge. 


Balanced XLR Switchbox - Audio Design HAS-3LB

Balanced XLR Switchbox - Audio Design HAS-3LB


One of my clients owns the unit, and wanted to take it to the next level. The Seiden switch is already top-notch, could stay, but we'd replace the copper wire with solder core silver wire in Teflon tubing, the XLRs with the shiny and beautiful Cardas XLRs, and the generic plastic feet with EAR isodamp feet. 

I will say in advance, if you will be using the Cardas CM F and CM M XLRs, you better have a solder pot. The rhodium plating is not terribly interested in taking on solder so the areas where the wires connect need to be submerged in very hot solder for 10-15 seconds before they will be responsive. I personally use an American Beauty MP-9 solder pot for small jobs like this. I turn it on to the highest temp and let it warm for an hour before using. Kester low dross solder works well. 

Once all the Cardas XLRs had been prepped, the old Neutrik XLRs were removed from the rear panel and replaced. They are the same DIN dimensions, so no need to change the hole sizes or shapes. Note that the Cardas units have pins can comply to some extent thanks to a soft material surrounding them. I don't know if this was done for vibration damping or maybe the tolerances aren't super tight, but just an observation. 

The 24 gauge solid silver is then hand-sleeved in Teflon tubing and attached to each terminal. One should note to not make the paths too short or tight, as this will pull on the decks of the Seiden switch and cause there to be less surface area for the gold plated contacts to press upon. I chose to add heatshrink tubing over the solder contacts as silver will oxidize over time. The oxidation is still conductive, but it doesn't look as nice. Also it keeps the joints secure when shipping. 

 
Balanced XLR Switchbox - Audio Design HAS-3LB

Balanced XLR Switchbox - Audio Design HAS-3LB

Balanced XLR Switchbox - Audio Design HAS-3LB

Balanced XLR Switchbox - Audio Design HAS-3LB


The feet on the unit are attached with screws into threaded holes. There are no nuts or lock washers to worry about, so switching them is quick and painless. 

Whether modded or not, I think the Audio Design HAS-3LB is a very solid unit with no real shortcomings other than a slightly vanilla design. Should you wish to extract every bit of performance out of a stock unit, reach out to zynsonix.com for pricing information. 


Disclosure: Please remember that building/modifying circuits can be dangerous to you and/or your surroundings and should only be performed by a certified technician. The owner of this blog and all associated parties can not / will not be held responsible if you attempt a build or modification posted above and cause physical harm to yourself or your surroundings. 

July 17, 2018

Cable and Mods for Sennheiser Massdrop HD6XX

Back in 2004 I purchased my first serious pair of headphones, a pair of Sennheiser HD600s. This was an introduction to a number of new concepts for me: headphones that are open, benefit from an amp, are sensitive to different cables, and are intended to be listened to at home (where you could be listening to speakers, sacrilege in some circles! haha).

In these formative days of headphone audiophilea I recall being at a meet in College Park, MD where there were a number of HD600s and HD650s. We were auditioning cables by Cardas, Stefan AudioArt and other DIY concoctions including pure silver cables. It was amazing what a difference the cable could make to the signature.

I'd long since sold my HD600s and HD650s and moved on to other headphones like Audeze, when I saw Massdrop and Sennheiser teamed up to released the HD6XX. The HD6XX is quite literally a more affordably produced HD650 (based on Inner Fidelity's measurements). I figured for $200 it would be fun to have a listen to the Sennheiser house sound once again, and see how good it could sound with a balanced amp and some tweaks.

If you're not familiar with Massdrop, it's an interesting business model where the company has a number of people commit to buy a product at a discounted price. Generally there are a certain number of buyers required to make the "drop" happen, and once it does, it can take months before you have a product in your hand. The upside is you can get some incredibly good deals so long as you're patient. Massdrop also teams up with manufactures to produce one-off products at a sizable discount, such as the Focal Elex, AKG M220 Pro, HiFiMan HE-4XX and other headphones which are a little different from what's on store shelves. The Sennheiser HD6XX is such an animal.

Looking at the HD6XX versus the HD650, you'll note the HD6XX has a dark blue headband versus silver and the screen printed "Sennheiser" on the top of the band is more subtle. I personally think the HD650 color scheme is a little easier on the eyes, but given this relatively superficial difference shaves $150+ off of the street price of the HD650s and still sounds identical, the choice is a veritable no-brainer.

The stock HD6XX

Given you're saving big bucks on the HD6XX, those dollars should go toward making them even better, right? I'll be going over a few tweaks you can do for improvements in sound, comfort, and looks.

One thing I couldn't be happier about is the trend toward calfskin earpads in the past decade. Exposed foam and velour don't feel all that great against my skin. The Sennheiser HD580, 5XX, 600, 650 and 6XX all feature velour pads, but fortunately there are companies producing replacement pads. I've found the Dekoni fenestrated pads are quite comfortable while allowing breath-ability. The pads snap in place on the frame and are quick and easy to install and uninstall.


Even with the new pads, the HD6XXs look a little dull, easily glanced over when looking at newer headphone designs with chrome and carbon fiber. I decided to reach out to Larry at Headphile to see about getting some custom wood cups. 

Talking about Headphile with some of the old-heads at HeadFi will elicit smiles and good memories. Larry's been at it for quite some time, and for a little while there, the "Darth Beyers", which were Beyerdynamic DT770 headphones modified with wood cups, were one of the most popular cans on HeadFi. Every now and then you'll see a pair pop up for sale, and if you like bass, I'd recommend you give 'em a shot. In addition, if you have the scratch, Larry is still building them with a number of wood choices... although I don't know if he's still building the deep versions (which I most favored). 

I chose Padauk (pronounced Pah-duke) wood as it's reasonably priced and has a nice reddish hue, which will pop on the dark HD6XX. Larry offers the cups open with screens or closed. The open versions sound pretty much identical to the stock screens with perhaps a tiny bit more reverb, and the closed versions have notably more reverberations (or a chamber-like effect) depending on what sort of damping is applied inside. 

The installation process is quick and painless. The screens are pressure fit on the frame, and using a spoon or similar utensil (I used an avocado knife) you can slowly pull the screen away from the frame and remove it. 

The screens can be removed easily with a spoon (or avocado knife)

The difference in color and presentation is night and day from the new wood cups and the existing stock screens. 

Headphile wood cups versus stock screens


Installation is completed on each side using a set of 4 brass wood screws. 


You will need to adjust the tension of each screw to ensure it has adequately threaded into the wood, but is not impeding on the cavity for the cable plug insert, otherwise the cable will either not insert at all or will be super tight.  


The HD650 (and HD6XX) is a warm-sounding headphone, no doubt about it. It can be a little too warm and rolled-off in the highs for some. This is where a cable comes into play. I opted to build a Zynsonix Xev cable for the HD6XX. While the most affordable in the line, it features silver-clad conductors, low-strand count and a PTFE (Teflon) dielectric, giving it a forward and detailed sound signature. It's exactly what the HD6XX needs, pushing forward the treble, resolving the bass, and giving the headphones a far more dynamic presentation. 


I wasn't sure if I would keep the HD6XX, it was more of an entertaining experiment, however with these mods the enhanced comfort and sound really make it a winner and a definite keeper. Headphone enthusiasts these days are quite lucky, as it would be very hard to reach this level of sonic performance at this price years ago. 

If you'd like a Xev cable made to your specifications (whatever length, sleeving, and termination you'd like), please reach out to Zynsonix today and take your Sennheisers to the next level. 


Zynsonix Audio, LLC does not have any relationship or financial interest in the companies mentioned in this post, including Headphile, Massdrop, Sennheiser, Inner Fidelity, Dekoni, etc.