Zynsonix Link

Showing posts with label electronics tools. Show all posts

December 6, 2024

Customizing your Milwaukee Packout Stack with Smart Mods and Labels

About a month ago I wrote up a post about Milwaukee’s Packout system and how it’s a boon not just for traditional tool guys and gals but for DIYers as well. Back then little did I know that the amount of aftermarket customizations available for Packout products is absolutely insane. From custom drawer and bin inserts specifically made to hold certain tools perfectly, to add-on side tables and mounts, to custom labeling for every storage area, there are a lot of options depending on your needs. I’ve interacted with a dozen or so companies/folks offering these products, and there is plenty of enthusiasm driving new options and product developments.

I think perhaps my favorite of the products are the 3D printed tool trays for the Packout bins and drawers. These are primarily available for the 3-drawer boxes and make your tools look as neat and tidy as Stewie’s arsenal in Family Guy. I found that Samuel from Toolitek that operating on Etsy offered perfect fitting options that look excellent. There are options available for M12 and M18 tools and batteries, including drivers, drills, impact wrenches, detail sanders, die grinders, and other items. The trays are printed in red and black for a perfect match to your Packout gear.


Tool and battery trays from Toolitek

For the 3D printed trays that fit inside the Packout bins, I’ve had good luck with 10Spot tools. This shop offers the Jonah Pope designs for reasonable prices, as well as other options such as the smaller trays for the bins with inserts that can accommodate drill bits, Dremel discs, jigsaw blades, and other items.

If you are looking to make your Packout stack more of a work center, there is a robust amount of side mount offerings. These mods were likely not predicted by Milwaukee as you will need to turn a drill on your precious bins to temporarily remove the side-bars, but I found it was well worth the trouble. At the top of each metal side bar, there is a round plastic protrusion that secures it in place. You can use a screwdriver to try to provide enough clearance to slip it out, but people have cracked or damaged the surrounding plastic doing it this way. The better way, in my humble opinion, is to drill away this plastic and use the rail caps offered by these companies to replace it. This allows you to secure the bar with a screw instead of pressure. Should you wish to change your side configuration in the future it will also be infinitely easier to remove the bar from the case.   

Aftermarket rail caps (top) and original caps (bottom)


My selected provider for the side rail offerings is PackibleTools. They have clearly spent a lot of time and attention on their products, and while they are more expensive than others, they exude quality. The primary reason I selected Packible over other offerings is the metal rail brackets. Given the nature of 3D printing adding plastic layers one by one, it can lead the plastic to split under pressure. In addition, utilizing plastic rather than wood for the side table reduces the weight when you need to reconfigure your stack, and the “juice grooves” are handy for catching small screws before they roll off the table. If you’d prefer a wood or steel side table, Dirt Church Industries has some nice looking options, and like Packible, offers the rail caps. Also I gotta admit it's a cool company name. 

Side mounted table and mounts from Packible


Side table and mount in upright position


Now if you want to customize your Packout stack to the tilt, there are folks offering 3D printed plastic handles and latches so you can note what you have in each drawer. Etsy sellers like Chris at TaylorCustomEng, 10 Spot Tools, and CustomToolKits each offer unique options customize and enhance your stack. You can label your drawers, label the side latches, label a handle, customize the square logo, the sky is the limit. I will say that getting the metal loop off of the latches is a PITA, but it looks so good afterwards I think it’s worth the hassle.

Finally, I’ll be discussing the custom trays for the Packout bins. The trays that come stock are perfectly serviceable, but if you’d like to arrange your bits and bobs in a more organized fashion you can order custom trays that hold the standard Milwaukee Shockwave bit holders. Simply yank them out of their organizer and pop them into the bins, easy peasy lemon squeezy. These trays are available from Michael at PolymerPrintCo, 10 Spot Tools, and MWReclaimed offers a similar solution that includes the hex bit holders.

Also, a special shout out to Michael at MWReclaimed. I had purchased a battery holder tray from him designed to fit in the Packout bins. It was a very nice product, but he actually redesigned it to keep the batteries from tumbling out if you are travelling out and about with your bins and things go horizontal and he sent me the new version free of charge. It caps the batteries with a tray so you can fit even more items in your bins, a super smart design. I look forward to seeing what else he comes up with! 

MWReclaimed battery storage tray, the left tray snaps on top, awesome design

Bottom line, the sky is the limit when it comes to configurations for this storage system, so whatever your DIY hobby or profession, there is likely one that would work perfectly for you.   

More images to come in the next few weeks!


November 7, 2024

Is Milwaukee's Packout System the DIYer's Dream Come True?

In terms of consumer products there hasn’t been much that’s really impressed me lately. The current trend has been that large corporations looking to cut costs are charging more for progressively inferior products, with the only solution being to pay a ton of money to smaller companies that still actually care about what they put on the market. While it's great to support small businesses, people generally don't have the coin to only buy well-crafted artisan products. 

Fortunately, Milwaukee, while being a large corporation, still seems to care about providing excellent performing tools that often win the various tool showdown videos on Youtube (now you know how I waste my spare time 😅). Do we all need a brand-new hammer drill with 1,400 lbs. of torque and an auto-stop feature that kills power when your wrist gets caught in that torque? No, but for those of us that do, it makes punching metal easier, and the auto-stop will be worth the money the first time it activates.

Similarly innovative is Milwaukee’s Packout system. Initially I brushed it off as a way to sell more cheap overseas plastic products to consumers. Given many Milwaukee tools are brushless I clearly made an error /dadjoke. On second glance, the Packout gear is a gamechanger for a variety of purposes, and it’s obvious why all the other brands are desperately trying to catch up.


Slim Packout tray with organization compartments


My use-case is probably outside of Milwaukee’s main audience, but it makes sense. My workroom is on an upper level, and while one of those big metal toolboxes (think Craftsman or Husky) would be really nice, getting an awkwardly sized 200lb. box up the steps is a deal breaker. The metal toolboxes also tend to pick up dings and dents on their way to the hardware store or your house which would dampen that serotonin hit when you buy a fancy new toy. Instead of a rolling metal toolbox, how about a rolling sturdy plastic one that largely works the same way and is much lighter? 


The tower of power

What if it’s modular so you can pick and choose which drawer configuration you’d like, and you can pull off a chunk of it (or all of it) and throw it in the car if need be?


Removable work surface


This is the genius of the Packout gear. It can be configured for a variety of needs and easily moved about the workroom, garage, or transported when needed. You do pay for the privilege though, as the Packout gear is priced at what I consider a premium, but it often goes on sale at Home Depot, so I’d advise waiting for a deal and using a cashback app to get a few bucks back.


Internal dividers are handy for organizing small parts


This system will definitely tickle the fancy of anyone who’s obsessive or has a touch of anal retentiveness, as Milwaukee offers some of their tools conveniently in Packout cases. The ¼” and 3/8” socket sets, hole saw sets, Shockwave bit sets, etc. that lock right into your gear stack. 


Mechanics socket set in Milwaukee brand trays


There are customizable foam inserts so you can get your tools arranged just the way you like them. More excitingly, though is there is a contingent of folks on Etsy making custom 3D printed inserts that fit your tools perfectly. If you are lucky enough to own a 3D printer there are files floating around you can print off as well.


3D printed battery tray for tool batteries

There are other modular items that pop on as well, like wet/dry vacs, coolers, work lights, etc. so it really caters to a variety of needs, so long as you can cover the cost of admission. 


Sorting my equipment knobs on the work surface


Given all the unique benefits, I think we are witnessing the next logical evolution of the garage toolbox that just so happens to be perfect for the DIYer in a workroom too.


February 1, 2012

Building Amplifiers - Tools of the Trade

A number of readers have asked what one might start with if they were planning on building amps and other audio electronics. After a number of builds you come to depend on certain tools to get the job done.  There are some that you can get by without and some that are pretty essential. The list might be overwhelming, but many of the tools listed are of low cost and there are likely already quite a few you already have. There are always varying degrees of quality in tools out there, sometimes you can get away with the online special, and there are other times when you'll actually want to spend a few extra bucks if you'll be using that tool repeatedly. Below are many that I've found to be worthwhile in electronics work.


SOLDER & SOLDERING ACCESSORIES

Solder Station
The most necessary tool on this list. There are solder wands out there, but if you're remotely serious about building electronics, step up to a solder station. A solder station will usually have a means of adjusting the temperature, which is essential for turning down when soldering sensitive semiconductors or turning up when soldering a large binding post. The Hakko 936 is a highly recommended station and can be found under $100. 

The Hakko 936 Solder Station


Solder
Solder needs to have a nice mix of flux and a low melting point to be easy to use. Kester 63/37 and Cardas Quadeutectic solder are both highly recommended solders; I've personally had good luck with both as well. Both contain lead, so proper precautions are necessary when handling either. Refer to http://toxnet.nlm.nih.gov/ for information on the safe handling of lead and other dangerous chemicals in solder. There are also a number of tin-free solders, however they require much more effort to get a good shiny joint in my experience.

Cardas Eutectic Solder

Solder Tip Cleaner
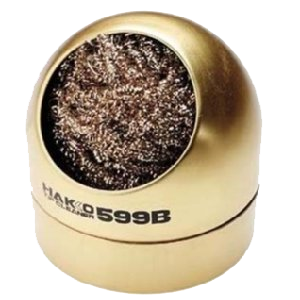
A tip cleaner is a nice easy way to clean the tip of the soldering iron between solder joints to get off any oxidation. The Hakko 599B is full of brass coils that remove the oxidation and prevent the iron from dropping in temperature like a damp sponge would.

The Hakko 599B Solder Tip Cleaner

Solder Reel Stand
Not really necessary but a nice-to-have that keeps your bench neat; this little stand holds a reel of solder and allows you to draw the solder smoothly.

Solder Reel Stand

Solder Sucker
Solder suckers are immensely useful and quite affordable at around $5. I've actually found the cheap ones work just as well as the more expensive models. These make use of a tip that can withstand heat, such as PTFE, and a spring-loaded suction tube. Putting the tip up to heated solder and pressing the button to release the spring can quickly remove it from a circuit board eyelet, connector or wire.

A Solder Sucker from Parts Express

Helping Hands
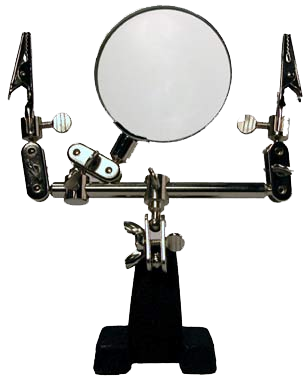
A great little device for electronics that will hold wires and connectors in place while you solder. Generally these are made of metal, include two clamps, one on each side, and have a weight at the bottom. Some models also include a magnifying glass. These are also quite affordable, you'd be hard pressed to find a set over $10.


A traditional set of helping hands

Toothbrush and Isopropyl Alcohol
After populating a circuit board, there is usually quite a bit of unsightly rosin flux that has dried around the solder joints. Only $2-3 is needed to procure a basic toothbrush and a small bottle of isopropyl alcohol which can help remedy this situation. Wetting the toothbrush with the alcohol and scrubbing away will help remove the flux from the board.

Basic toothbrush and isopropyl alcohol


SAFETY RELATED ITEMS

Fume Extractor
Since solder has lead in it, it's in one's best interest to not breath in the solder fumes. A fume extractor will help remove the fumes from the air. There are a number of models out there, some are not much more than glorified fans, some are able to be positioned on a pivoting rod, and some have deluxe filters. Prices range from a few dollars to well over $100 depending on the quality and complexity.

A typical solder fume extractor

Protective Glasses / Goggles
Probably another no-brainer, it's important to protect your eyes from random bits of molten-hot solder and airborne metal dust. I haven't found a set I'm in love with, but the Dewalt protective glasses seem to work fine.

Ear Protection
You're going through all this trouble for better sound, make sure you protect your ears so they'll be able to enjoy it. Simple isolating ear buds can help to some extent or larger ear cups from companies like Peltor, Browning or Trademark are worthwhile when you're going to be cutting through a lot of metal.


TOOLS

Rotary Tool
I'd consider this an absolute essential; the rotary tool in my workshop is constantly in use. It can be used with sanding bits to de-burr drill holes, enlarge existing holes, cutting new holes and trimming down screws with the metal cutting disc attachment. There's quite a variety of tools and attachments made by Dremel to add utility to this little device. Dremel, Black and Decker, Dewalt, Kawasaki and other brands offer rotary tools, many of which work with the Dremel attachments.

Dremel tool with cutting disc


Desk Vise
Much like the helping hands, a desk vise will hold things for you while you work. The desk vise is well suited for holding small pieces of aluminum or steel that need to be trimmed, circuit boards to be soldered to, screws to be shortened and other various items. Below is an example, the Panavise 381 with a suction base, but there are many other varieties to suit various purposes.


The venerable Panavise 381

Flat and Phillips Head Screwdrivers
Probably a no-brainer, but with nearly every chassis and socket you'll be needing to secure something with a screw and / or a nut. A precision set of screwdrivers is also recommended for adjusting miniature board-mounted potentiometers and using small size #4 hardware. 

A precision screwdriver set

Set of Pliers
A set of pliers goes a long way. Pliers can be used to hold small nuts in place while tightening screws, holding small items that your fingers might be too large and clumsy to hold, trimming small pieces of metal and a variety of other uses. Even a cheap set will be worth it's weight in gold around the shop. 

A generic set of miniature pliers


Adjustable Wrench
For larger nuts that need to be tightened, like with potentiometers, stepped attenuators, balance controls, and switches, an adjustable wrench is worthwhile so you can get the grip you need that won't slip like a set of pliers would. A socket wrench may also work but it would need to be fairly deep to accommodate the above. 

Adjustable locking wrench


Socket Wrench
A socket wrench is a wrench with interchangeable heads or sockets that allow it to turn various size bolts and nuts. Great for mounting RCA females with nuts on the outside like Cardas and mounting binding posts. The socket wrench will ratchet either to one side or the other depending on how it's set which facilitates the tightening process. 

Socket Wrench and Sockets

Tap & Die Set
Prepping a chassis to hold PCBs, tube sockets, transformers and other items requires drilling the necessary holes, then tapping the holes for the proper size screws. This involves inserting a tap in a "T" wrench which holds the tap steady while one turns the wrench, "tapping" the hole. One could likely get by with just size #4-40, #6-32 and #8-32 tap set to start with (along with the obligatory "T" wrench) they are the most common sizes in building. 

A set of taps


Miniature Wire Cutter
It's worth spending a few extra bucks on a good miniature wire cutter, it will be used constantly to trim down excess leads after soldering. It needs to feel good in the hands and be sharp so that excess force isn't necessary to trim the leads. I've had good results with Klein and Xcelite. 


An Xcelite miniature wire cutter


Wire Stripper
Just like the miniature wire cutter, spend a few extra bucks here. There are quite a few wires in a point-to-point amplifier, so there will be a lot of wire stripping. Klein Tools makes great wire strippers in my experience. Wire strippers come with a variety of gauges they will work with. Generally, 18-24 gauge are most typically found inside amplifiers. 

Klein wire stripper

Greenlee punches
Greenlee punches are quite expensive. but worthwhile if you'll be using them frequently. If one is building tube amps and fabricating their own chassis, having common sizes for ceramic and/or Teflon tube sockets is a nice-to-have. The Greenlee units are basically a draw stud that tightens the die and punch together when a ball bearing nut is turned on the top (see figure below). This requires a pilot hole to be drilled drilled in the center of where the hole should be on the chassis to accommodate the draw stud. There are special tools made by Greenlee to tighten the dies but a socket wrench can also be used on a budget. The holes come out perfectly accurate, which is their real appeal. 


Stepped Drill Bit
A stepped drill bit is handy for making holes for tube sockets and large switches and jacks if one does not have the proper sized Greenlee punch for the task, or doesn't want to pony up the cash for a Greenlee die (perfectly understandable). A stepped drill bit starts off small at the bottom and incrementally gets larger. It can be difficult to get perfect results like with a Greenlee punch but they can be very accurate if used with a drill press. 


Drill Press
A drill press is a pretty great tool to have for chassis building; they offer much more precision than a hand drill, and don't come with the fatigue associated with trying to drill dozens of holes with a heavy battery-powered hand drill. Once can purchase a bench drill press for about $200 from companies like Rockwell or Delta that are very adequate, just be sure to have the room for it. 

Delta DP300L Bench Drill Press

Heat Gun
A heat gun is useful for shrinking heatshrink tubing over wires. The heatshrink can act as a strain relief for a cable, to prevent shorting if there are two exposed wires near each other, to keep multiple wires together for organizational purposes, or to color code wires among other things. Certain heatguns allow for attachments that can help direct the heat around a cable.

A Milwaukee Heat Gun

Pop Rivet Gun
One of my personal favorites. A pop rivet gun can be used in place of a screw and nut when something needs to be secured but will never need to be removed. The pop rivet is placed in a drilled hole and the gun trigger is squeezed, expanding the tail and securing the rivet in place. Easy does it.


A pop-rivet gun

There are certainly many others, but listed above are the basics. Know one that I missed? Tell us in the comments section!


The Fine Print:
The owner of this blog does not have any personal or monetary relationship with any of the brands mentioned above. The tools and items listed above can be potentially dangerous and should only be handled by a professional. Please remember that building amplifiers and other electronics can be dangerous to you and/or your surroundings and should only be performed by a certified technician. The owner of this blog and all associated parties can not / will not be held responsible if you attempt a build using the tools or items above and cause physical harm to yourself or your surroundings. Please keep this in mind.